
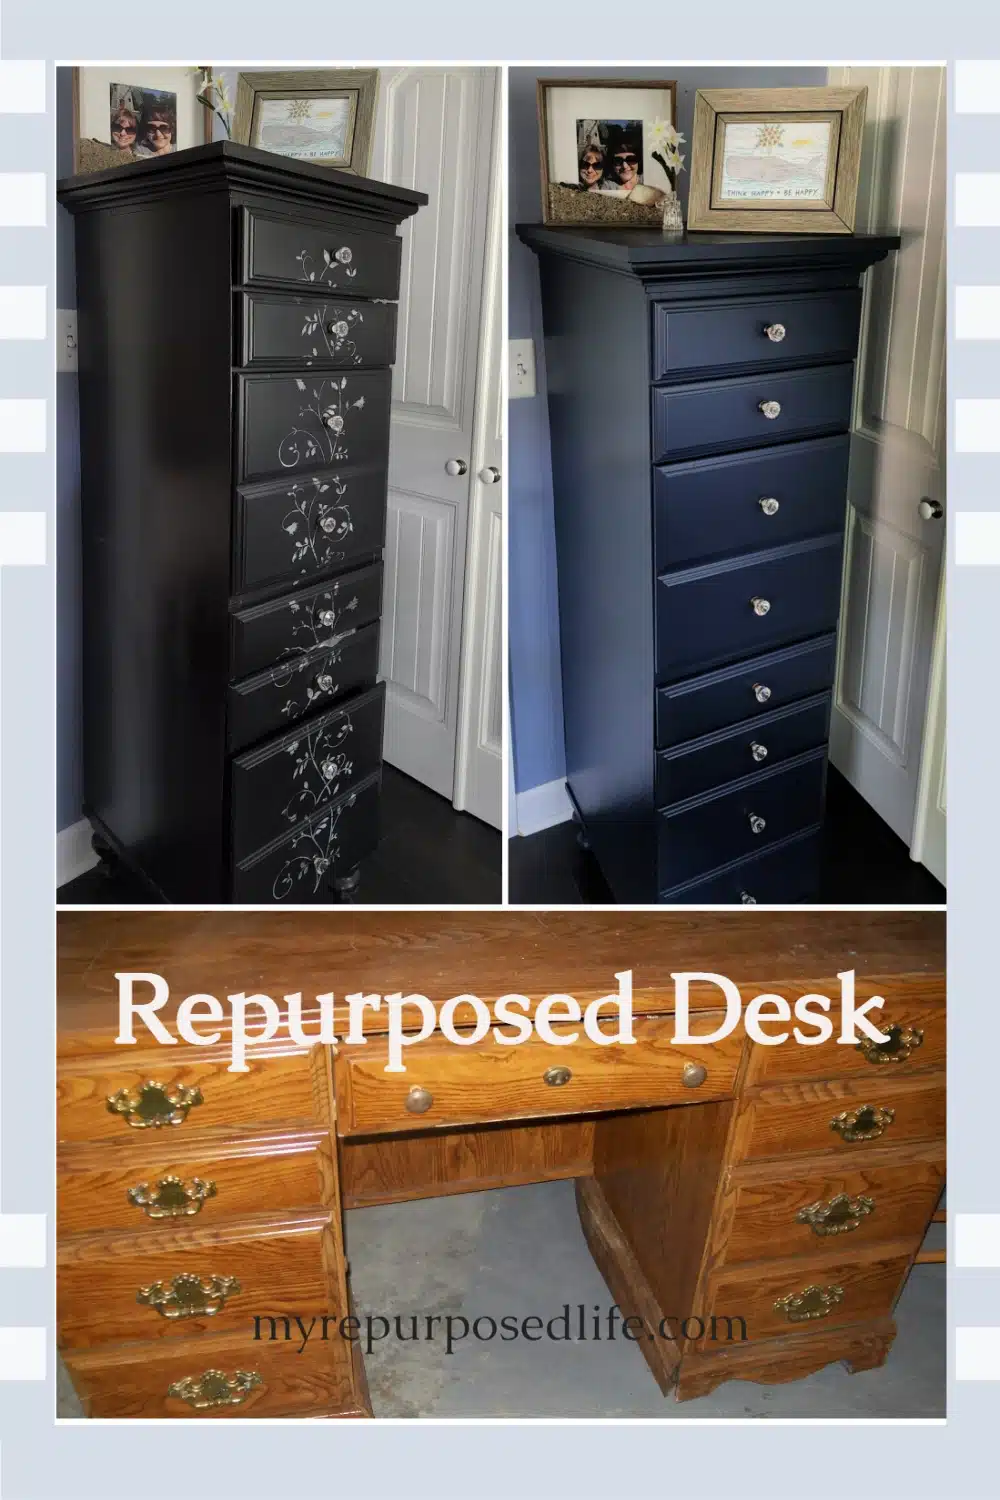
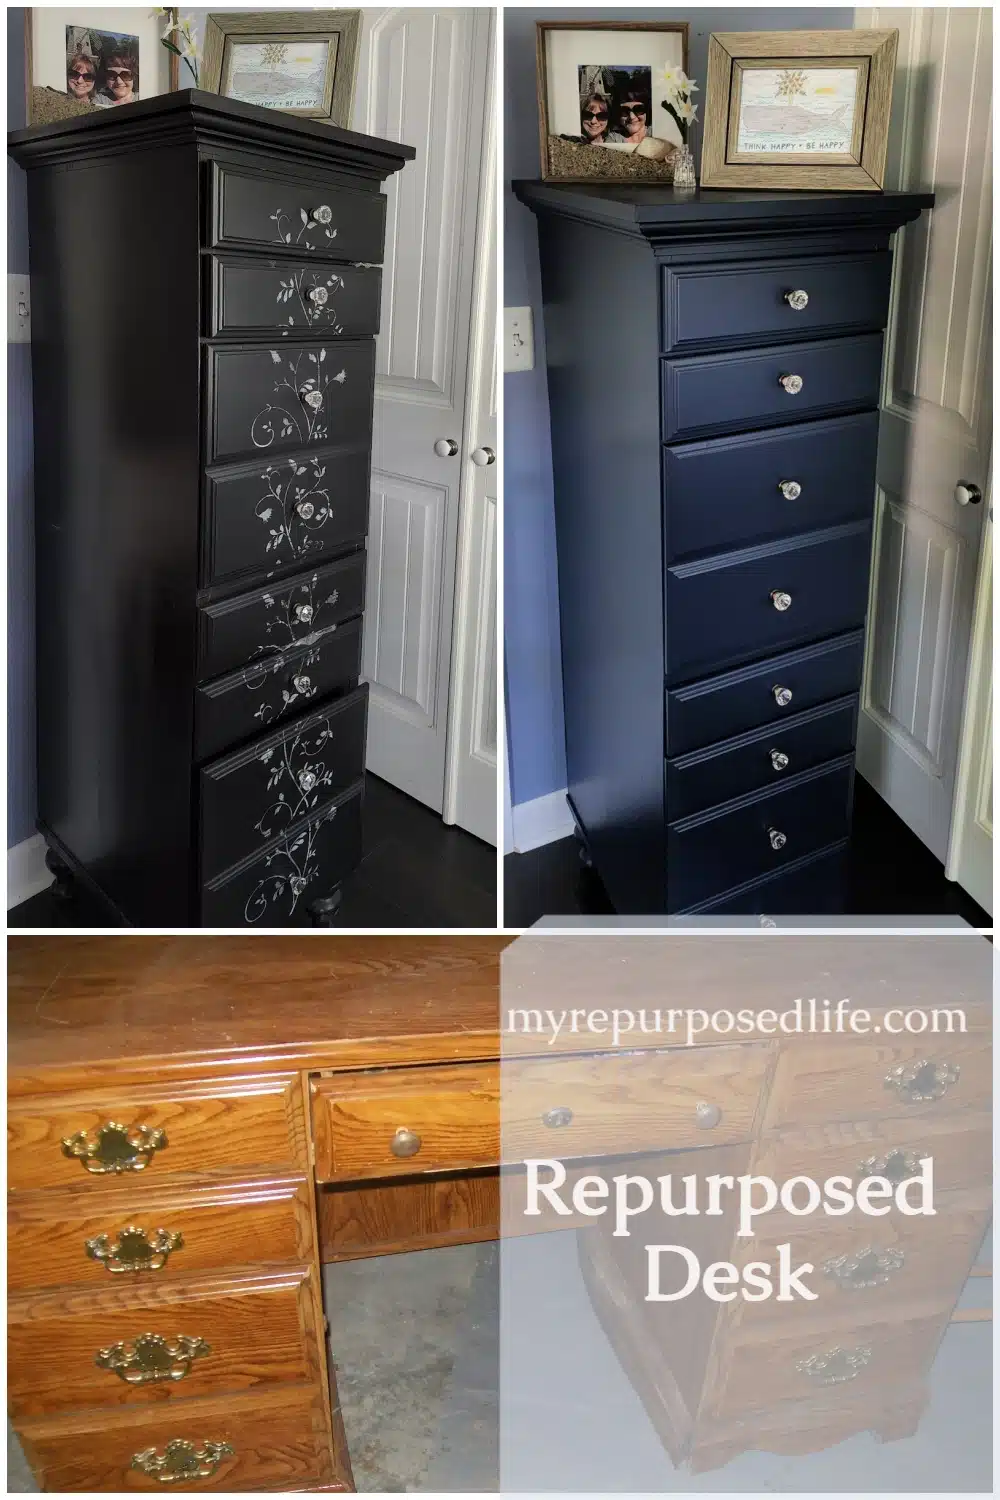
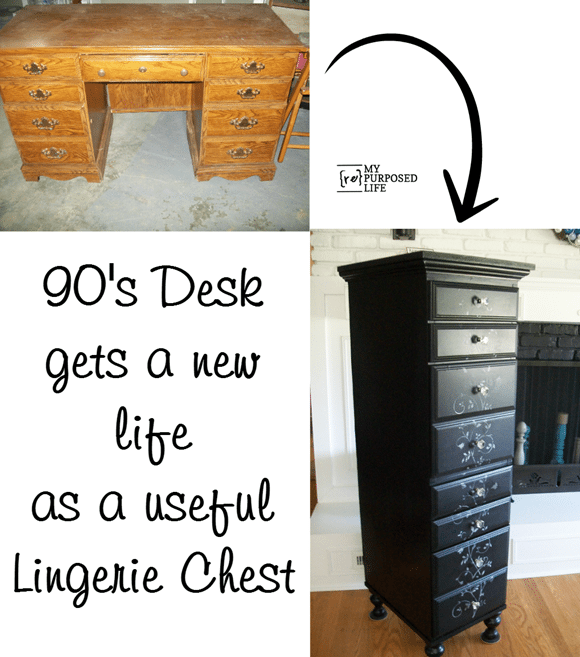
Turning a repurposed desk into a new piece of furniture is much better than throwing it out. I'm sure you've seen a lot of repurposed desks into nightstands. But have you ever seen the two-drawer sections stacked?
UPDATE! I painted this piece, and I love the new look . . . but FIRST, let's take a look at how I built this unique chest out of a desk!
My favorite repurposed desk had been the one I repurposed into a kitchen island. But now I have a new favorite.

This is a long post: grab something to drink and a snack, folks!
The desk enjoyed quite the life back in the 90's:
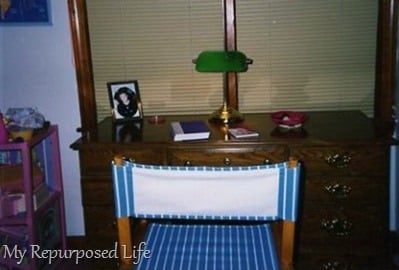
While my daughter Jamie was still playing with Barbies, 🙂 However, it had been stored in the basement for about ten years.
Does your desk have missing drawers? See how to work around a desk with missing drawers.
Let's see how I repurposed this desk into a tall lingerie chest . . .
Perfect Repurposed Desk Candidate
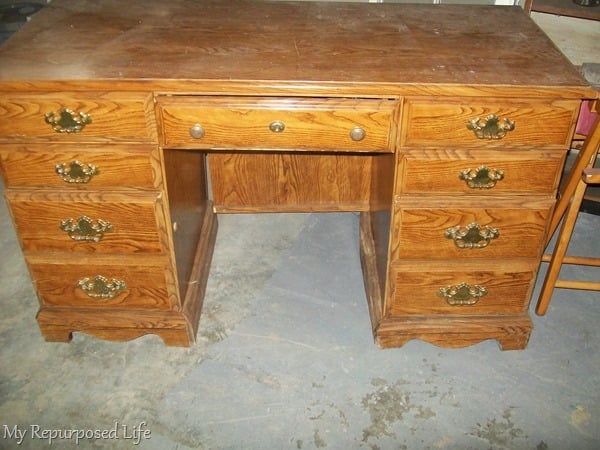
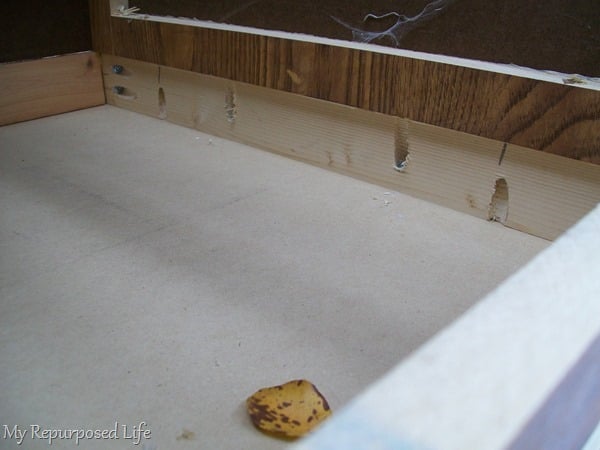
The vintage desk had seen better days. Unfortunately, there was some water damage on the bottom trim. In addition, you can see some separation of the knee-hole board in the back.
Dismantle Desk
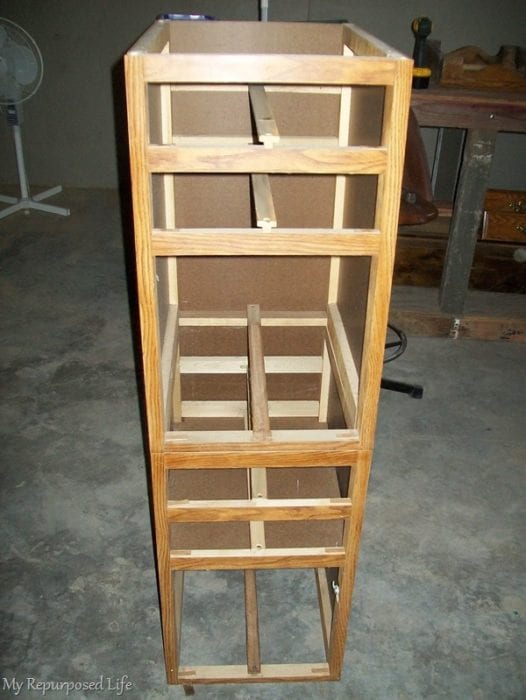
To begin, I removed the top of the desk and all of the bottom trim pieces, stacking the left side on top of the right side to see if my vision would work.
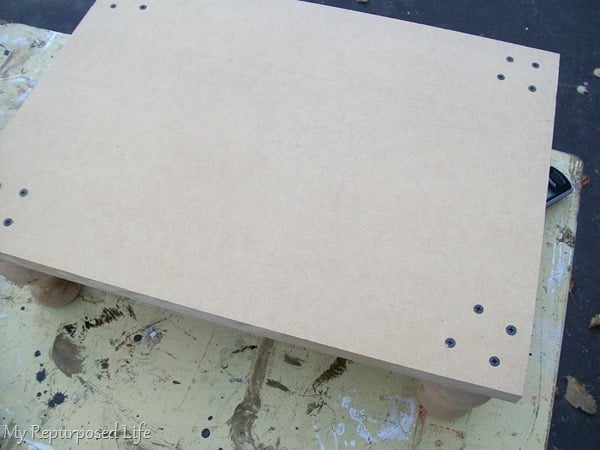
Add Base to chest
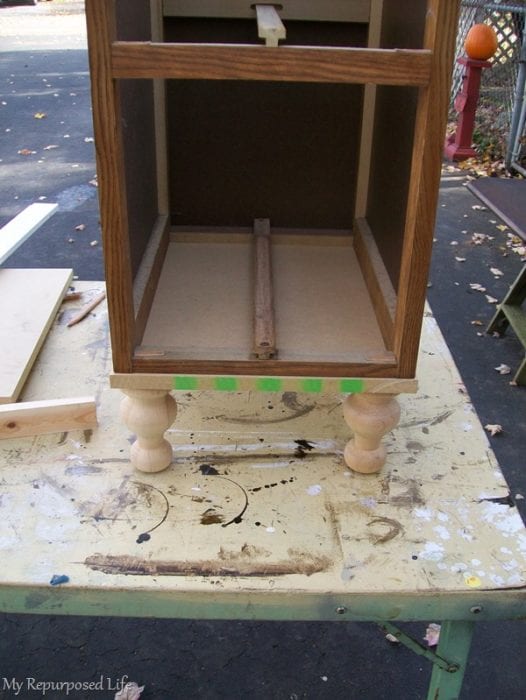
It's a good idea to test your fun feet before moving forward.
How to add legs to furniture
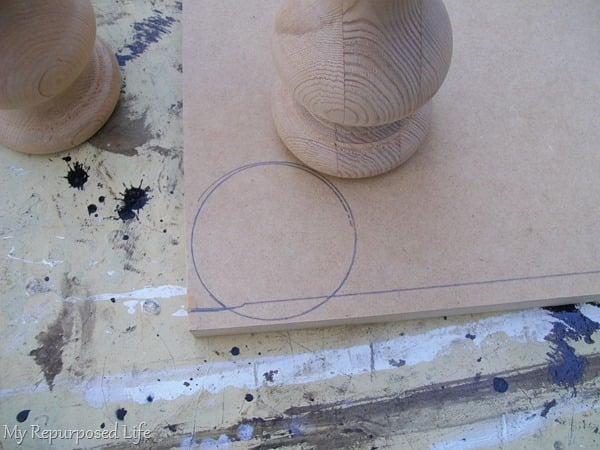
Indeed, I thought they would work. I got busy attaching them. I first drew circles around each of the four feet. The bottom and top of this cabinet are pieces of MDF I had left over from when I built my media center.
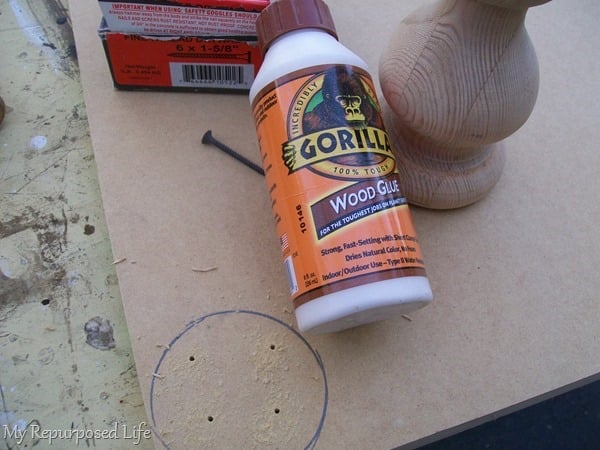
TIP: Drill four pilot holes inside each of the circles. Gorilla Wood Glue was used for extra hold with the screws.
Drilling the pilot holes is a must to get the screws successfully into the feet.
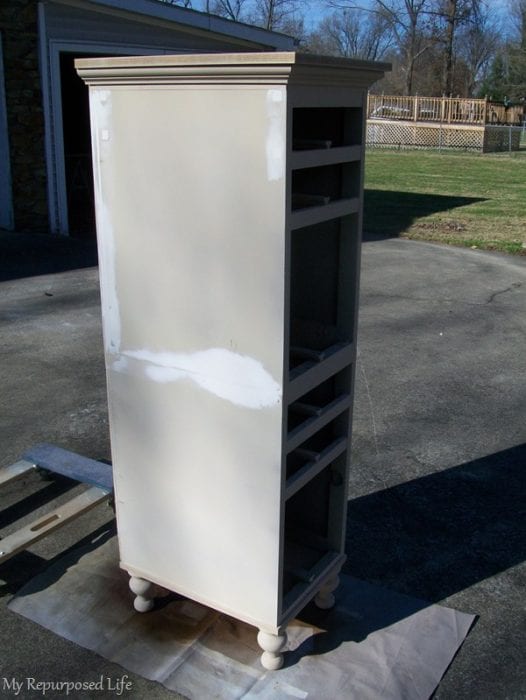
Add trim to lingerie chest
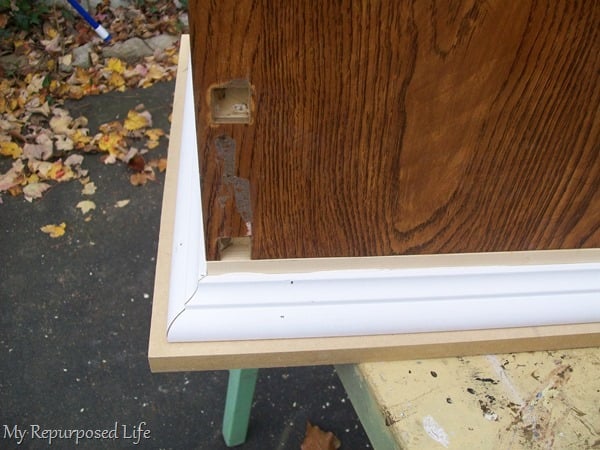
I had to beef up the top of the new lingerie chest to get the crown molding to clear the drawers. Later I filled those large holes with some wood putty and then spackling)
I cut some 1x down to size and attached them with pocket holes using my Kreg Jig.
Need more details on using a Kreg Jig? See my article How to use a Kreg Jig Pocket Hole System.

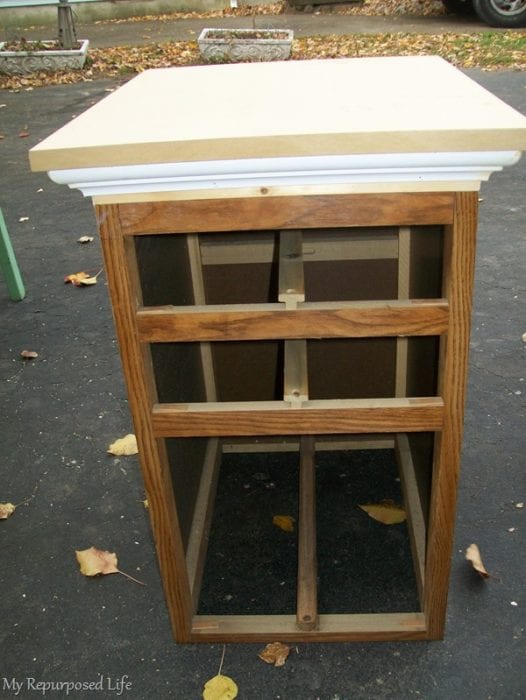
Using the original drawer sections of the repurposed desk, you can see that had I put the MDF directly on top of the drawer tower, I would not have had room for the crown molding trim.
Attach Two Drawer Sections To One Another
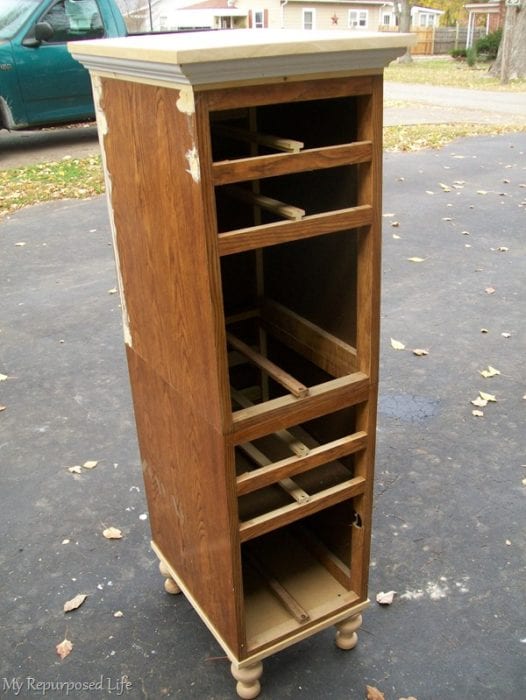
I used some of the original holes and added some pocket holes to attach the two pieces together to change the repurposed desk into the lingerie chest. However, the two pieces were still a little unstable.
Add A Plywood Back
You know how that cheap furniture has cardboard backings that you tack on with those little nails to keep is "squared up"? I decided my tower needed a little strength in the back.
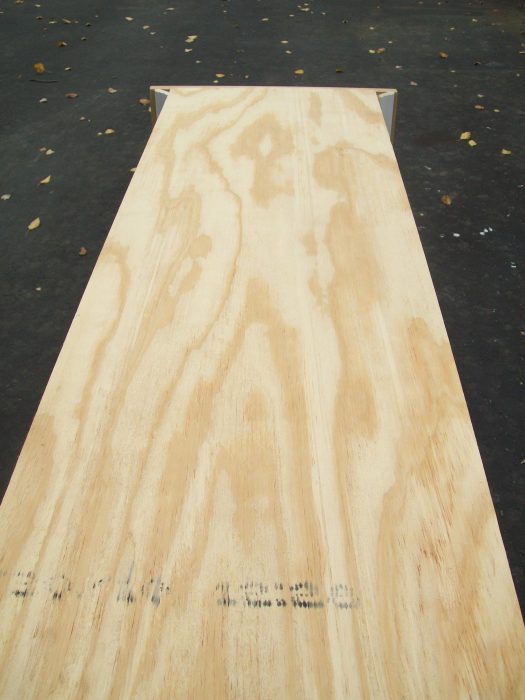
In other words, I used a piece of thin plywood to sturdy it and keep it squared. It worked perfectly!
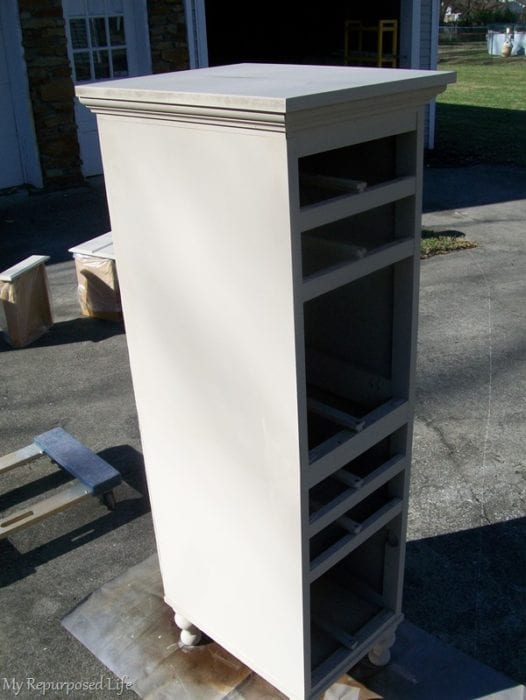
Primer and Paint For Lingerie Chest
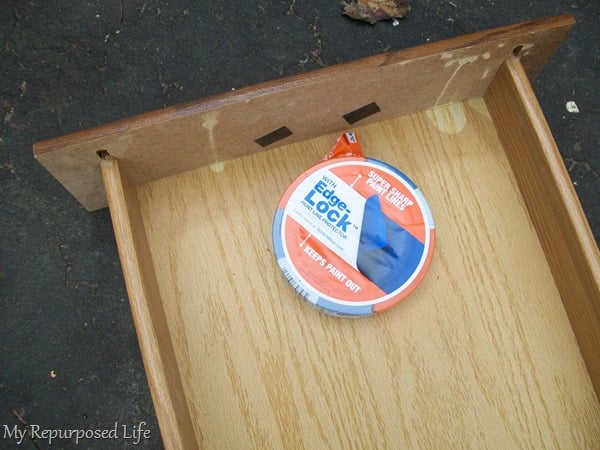
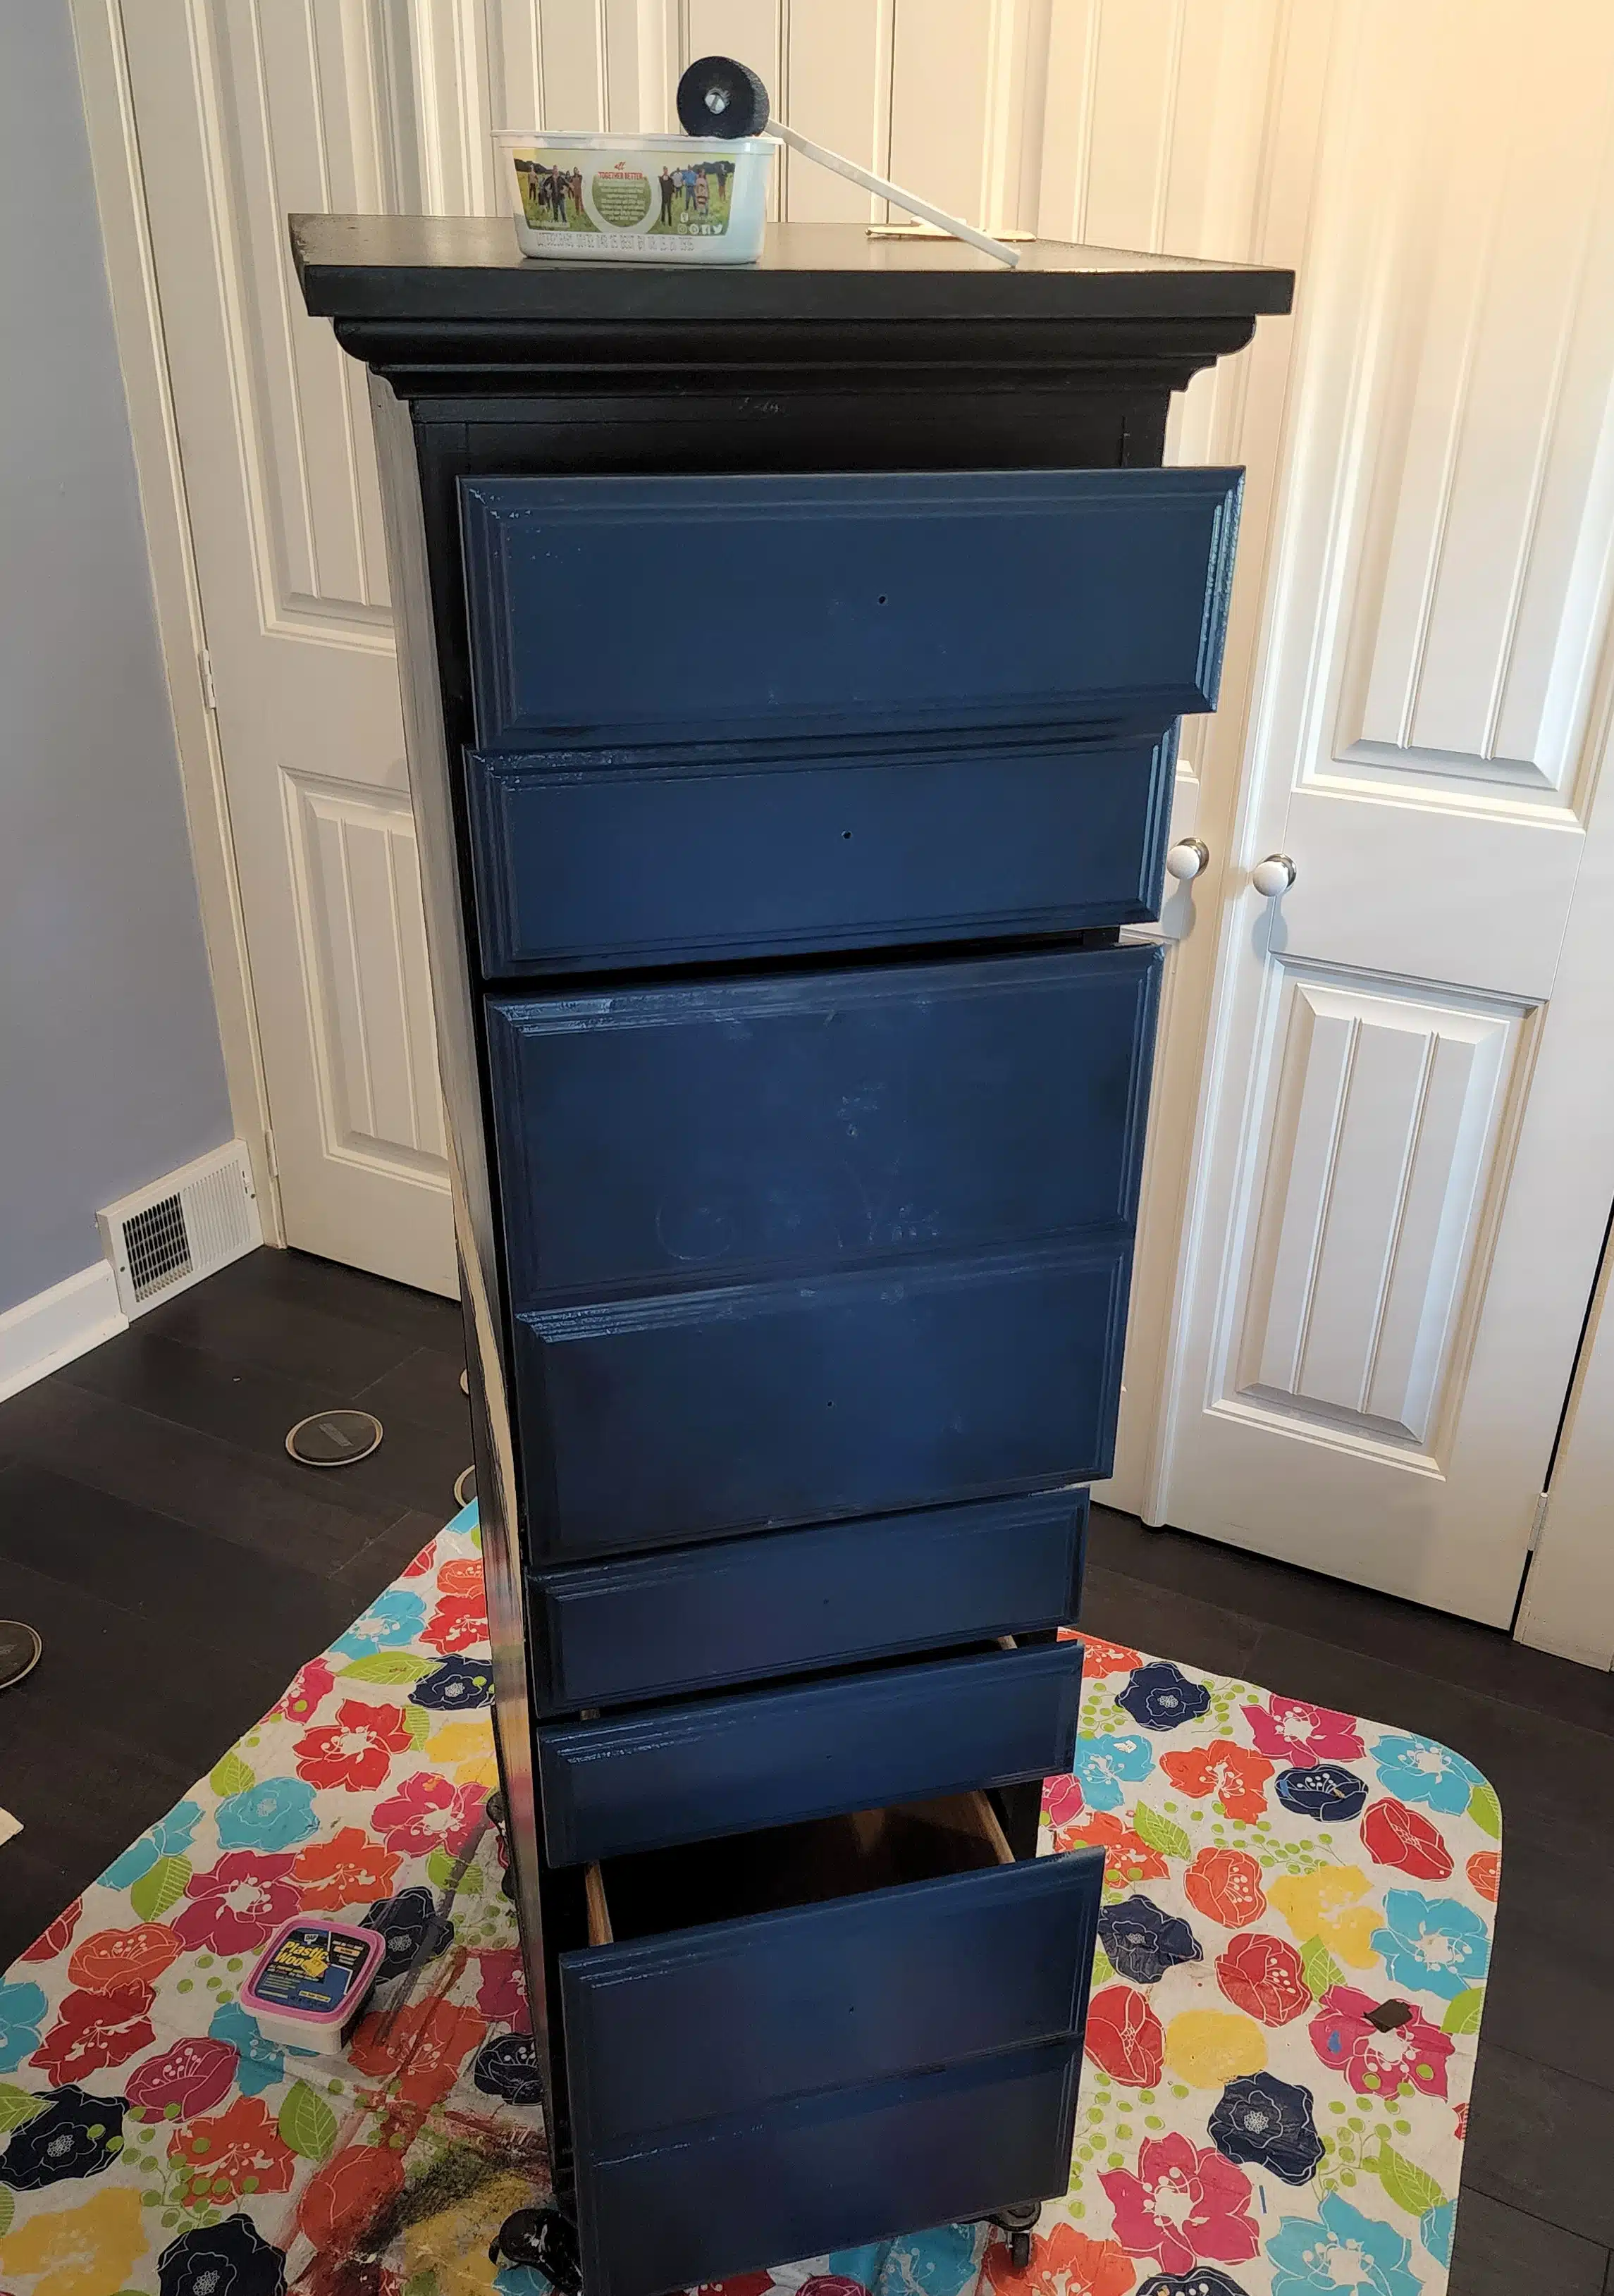
Time to start painting. Oh-do you see those two pieces of Gorilla Tape on the drawer front? I filled all the original drawer pull handles with wood putty.
TIP: To prevent seepage, use tape to keep the putty from coming through the back side.
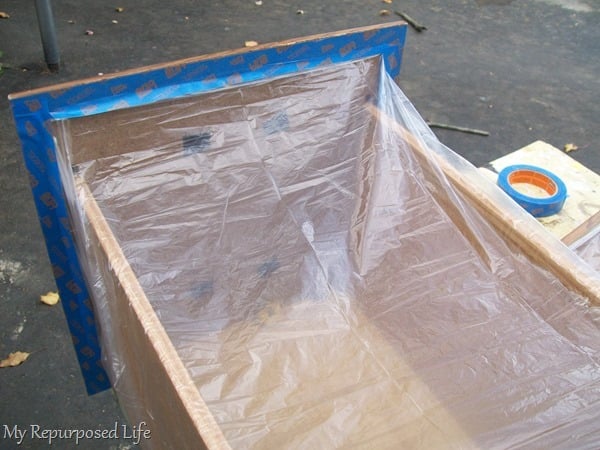
Painter's tape was used to hold plastic in place. I didn't want to paint the drawers because I wanted them to slide in and out easily, and they were still in pretty good shape.
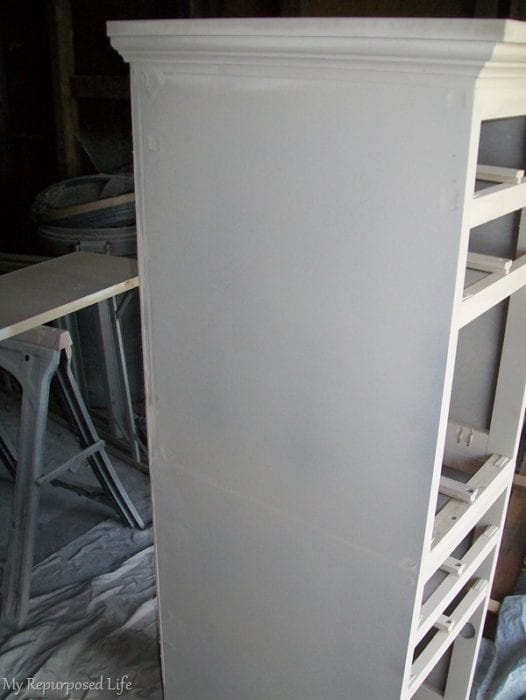
I used my HomeRight Finish Max Fine Finish Sprayer![]() to apply some primer to all the pieces.
to apply some primer to all the pieces.
After a coat of primer, I saw that I still needed to do some patching. I used spackling for this.
Here it is sanded and another coat of primer. Looks better, but not as good as I would like, hence the nickname "Tower of Terror". In hindsight, I wish I had put Luan or bead board on each side of the repurposed desk chest: similar to how I did on this Upcylced T.V. Cabinet.
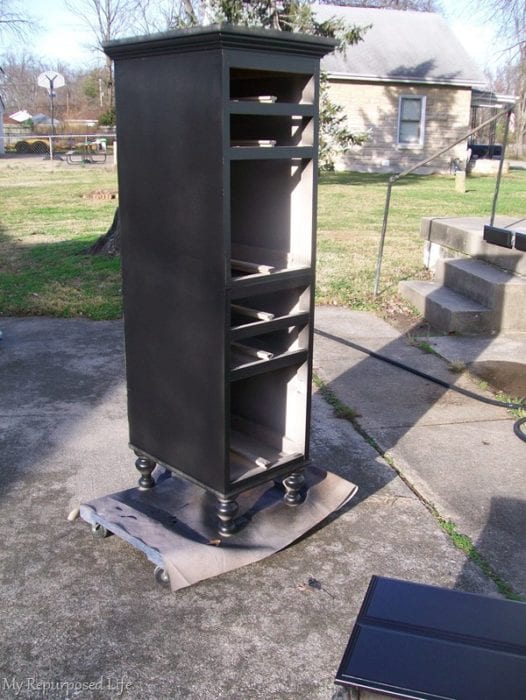
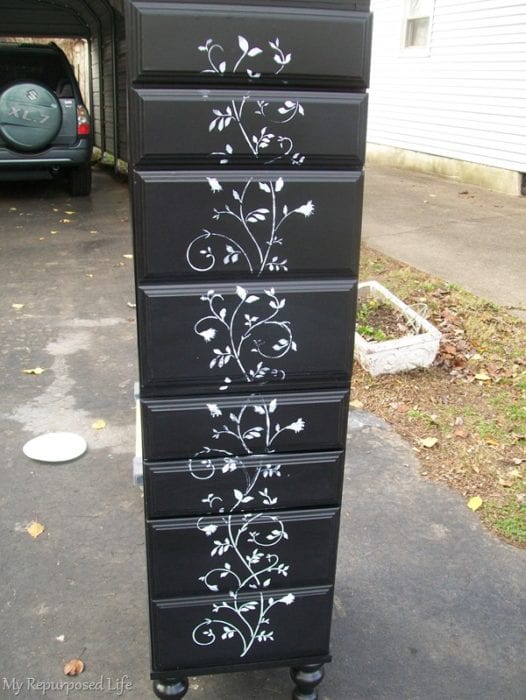
After the first coat of black paint.
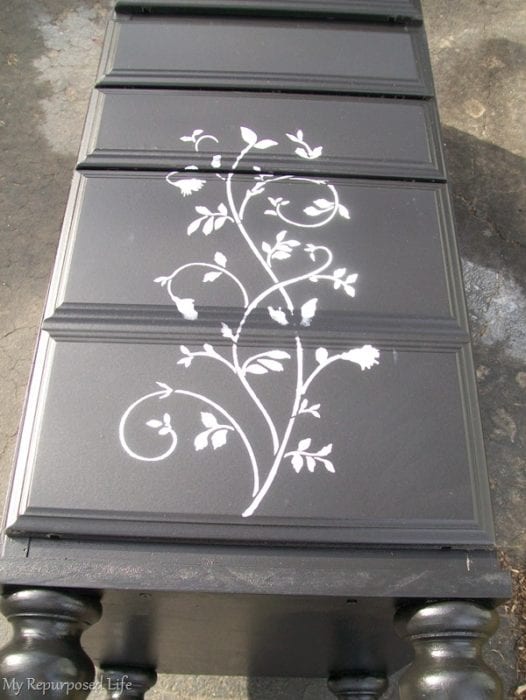
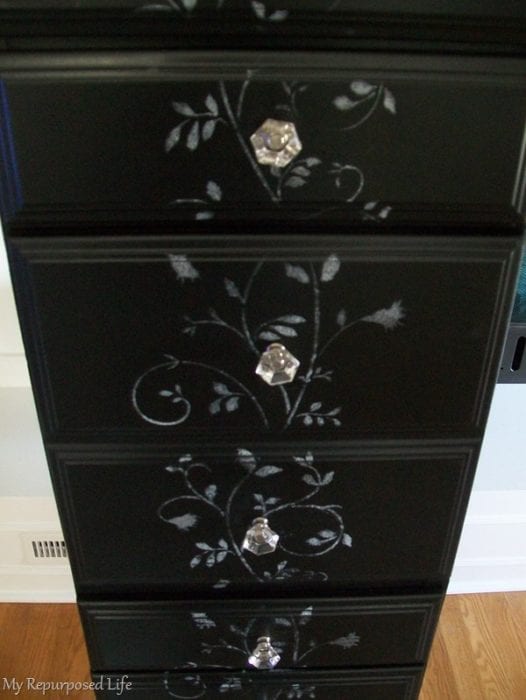
Embellish With Stencils
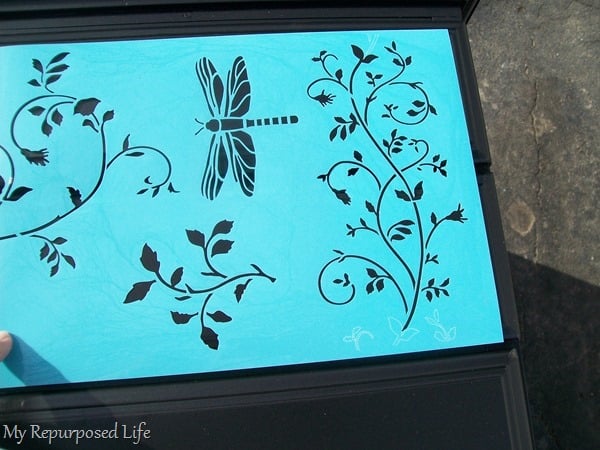
Way back when, I received some great products compliments of Plaid/Martha Stewart. These awesome stencils were part of that selection. I'm trying to figure out which stencil I wanted to use. I decided this one (far right) is too small.
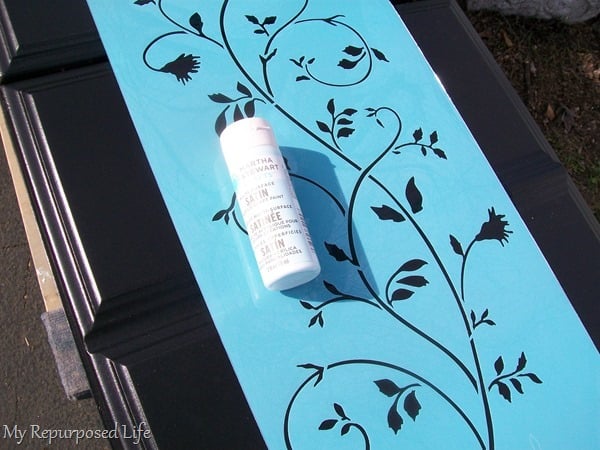
The larger version seemed like the best fit. I used some of Martha's craft paint, it was a very light shade – actually a shade of blue. An aged gray look was the end goal.
After I painted on the first stencil sheet, I decided it was too "stark". I was looking for more of a faded (aged) look. I didn't want to sand back the drawer, so I used a damp paper towel and scrubbed/scraped off some of the paint I just painted. No pictures of this step—sometimes time is of the essence, and a blogger doesn't have time to pick up the camera!  I laid the chest down on its back to do this step. Doing it this way, I didn't have to tape my stencil. I used my hem guide to ensure the space was equal on the left and right sides.
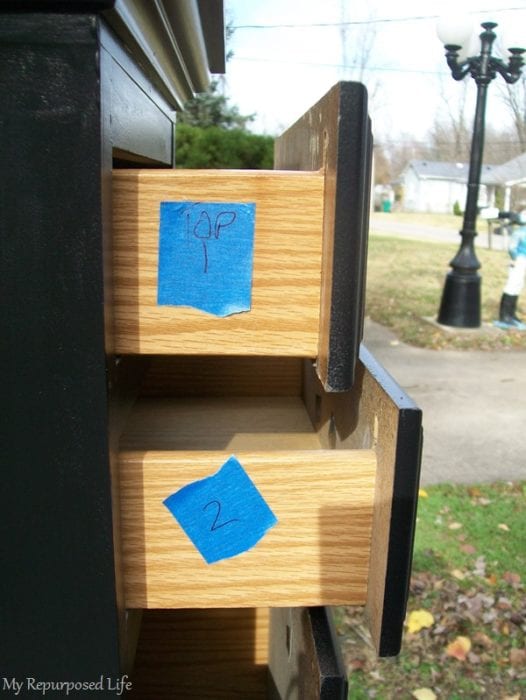
After I painted the stencil, I marked the drawers with painter's tape to easily get them in the right order when I moved the tall chest into the house.
Step 9 Install Glass Knobs

Time for some knobs! I loved these pretty glass-look knobs.
How To Use A Hardware Jig

If you've ever tried to center hardware and get it the same on each drawer, you know how difficult it can be. This handy Jig from Rockler makes it easy.
The block on the left lines your hole from left to right, while the plastic piece centers your hole from top to bottom. The automatic center punch "dents" a little hole that guides your drill bit. LOVE it!
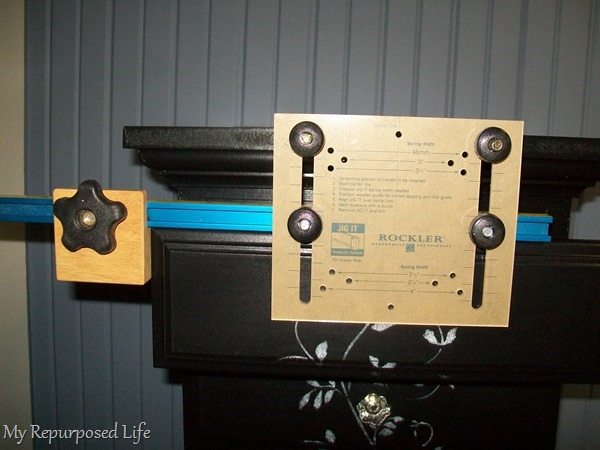
You can see how adjustable this hardware installation jig is. It is very helpful.
The knobs were installed in no time!
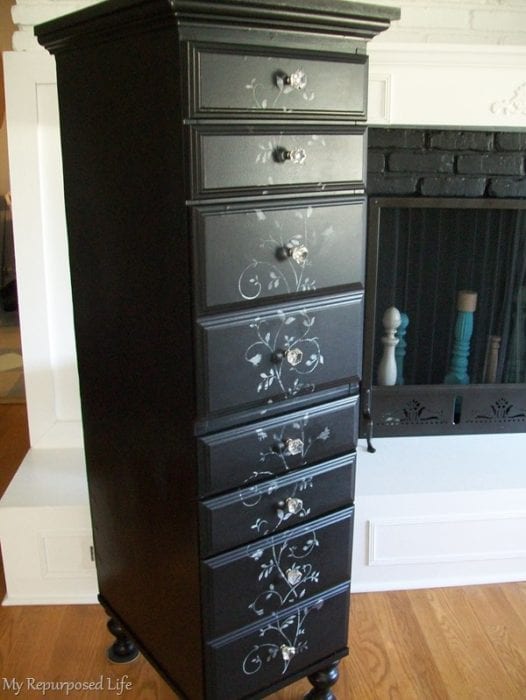
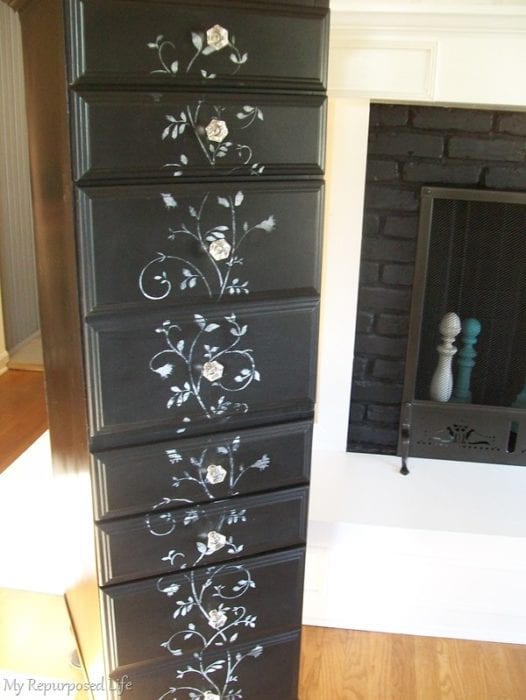
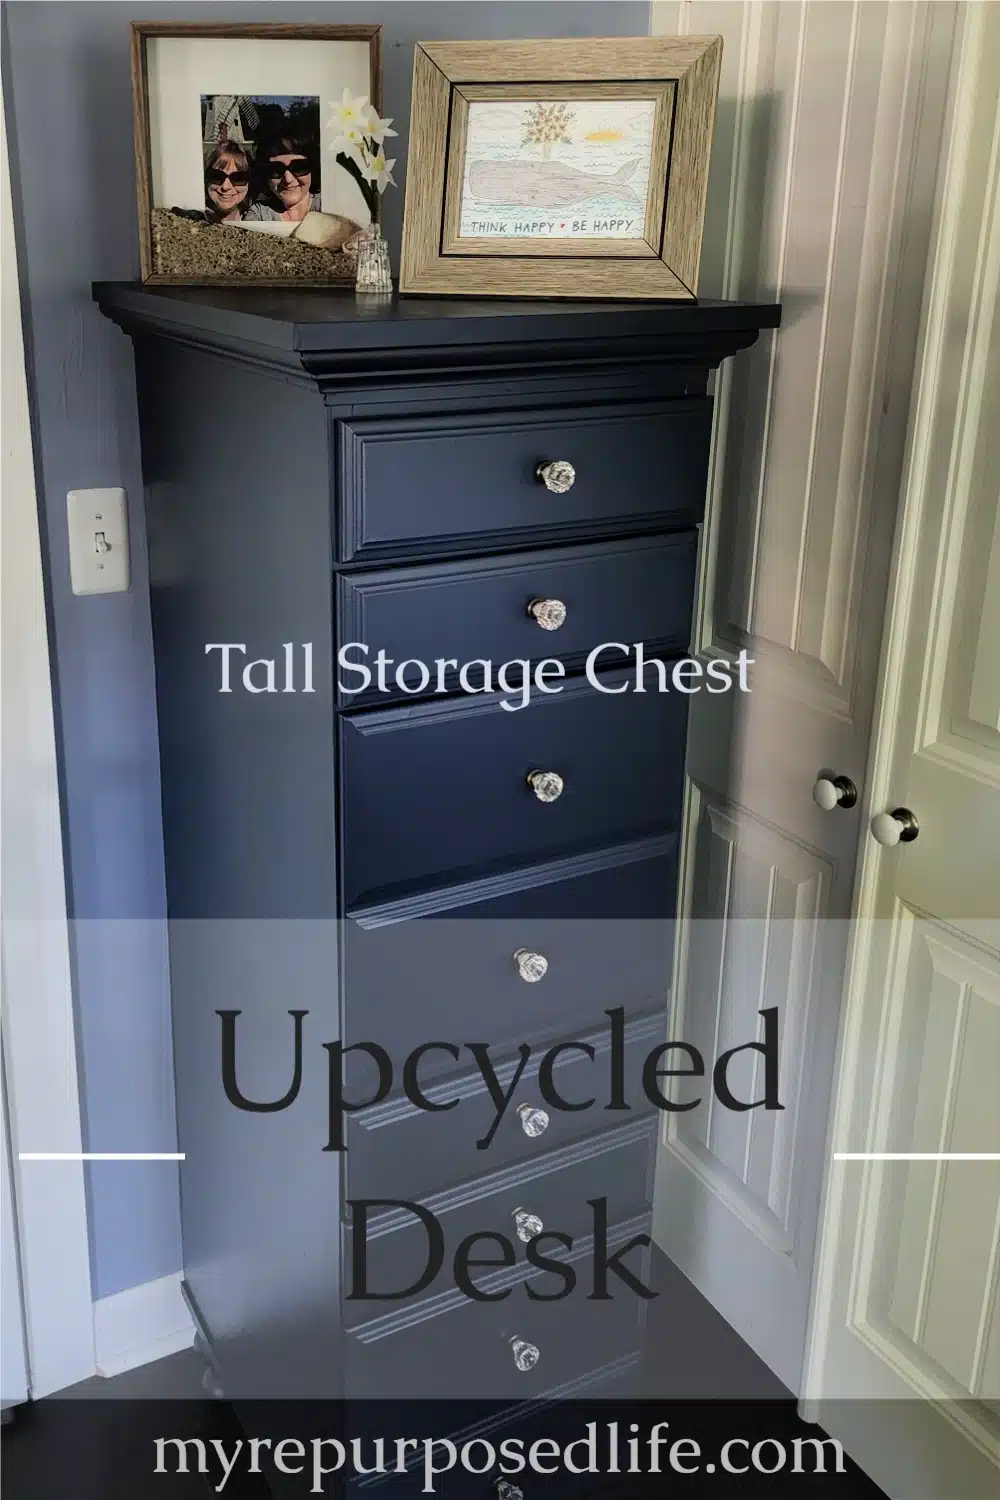
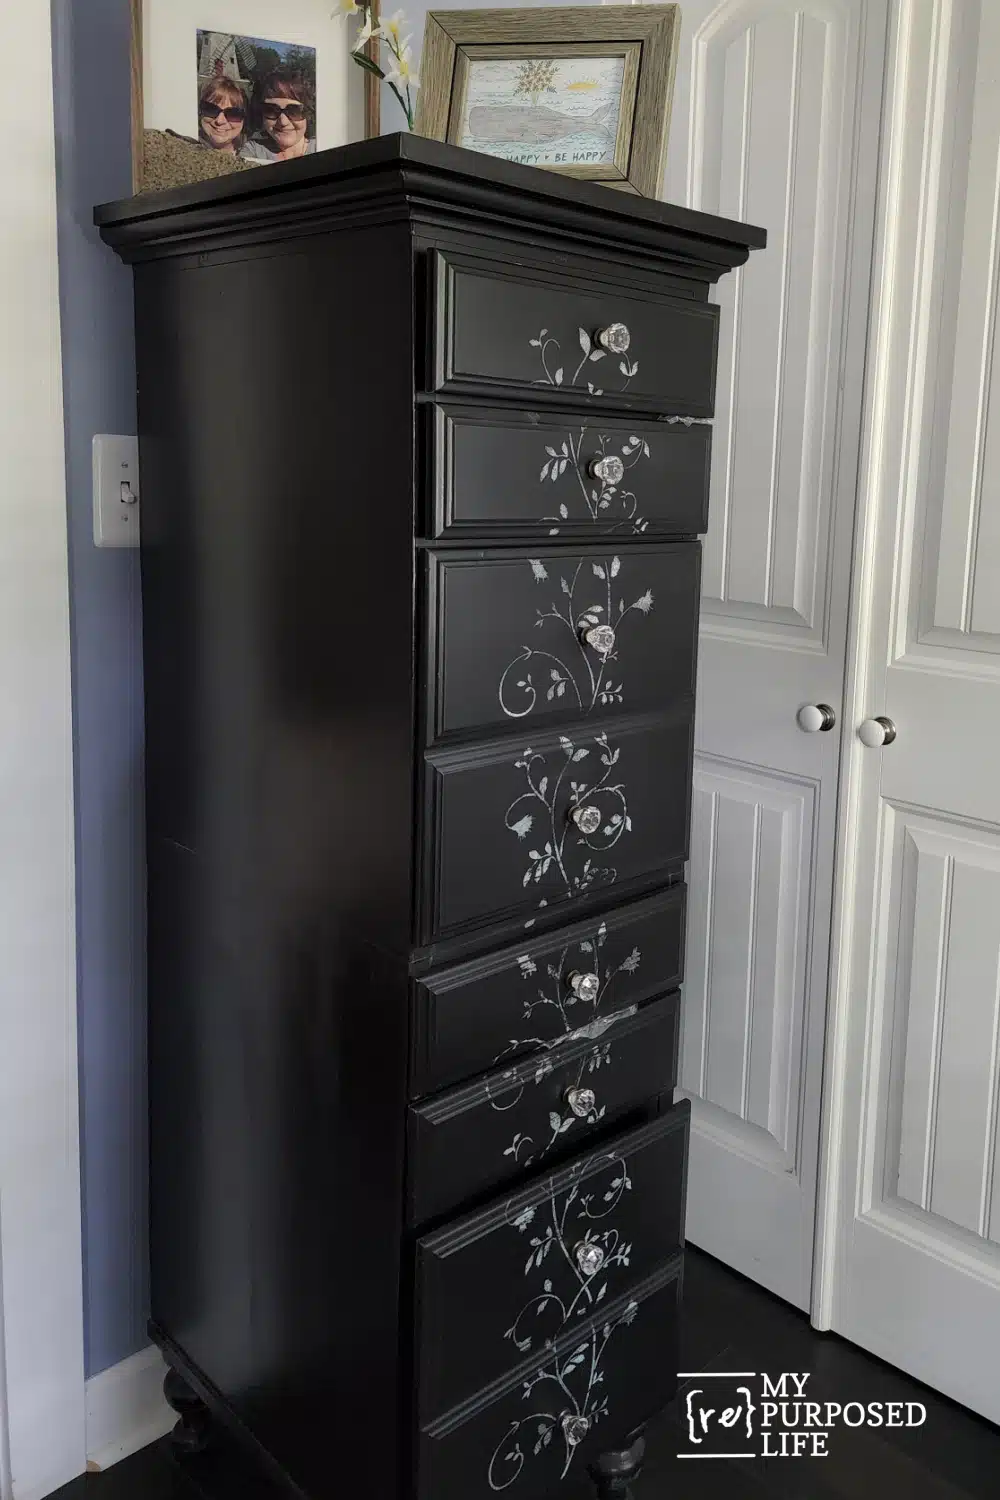
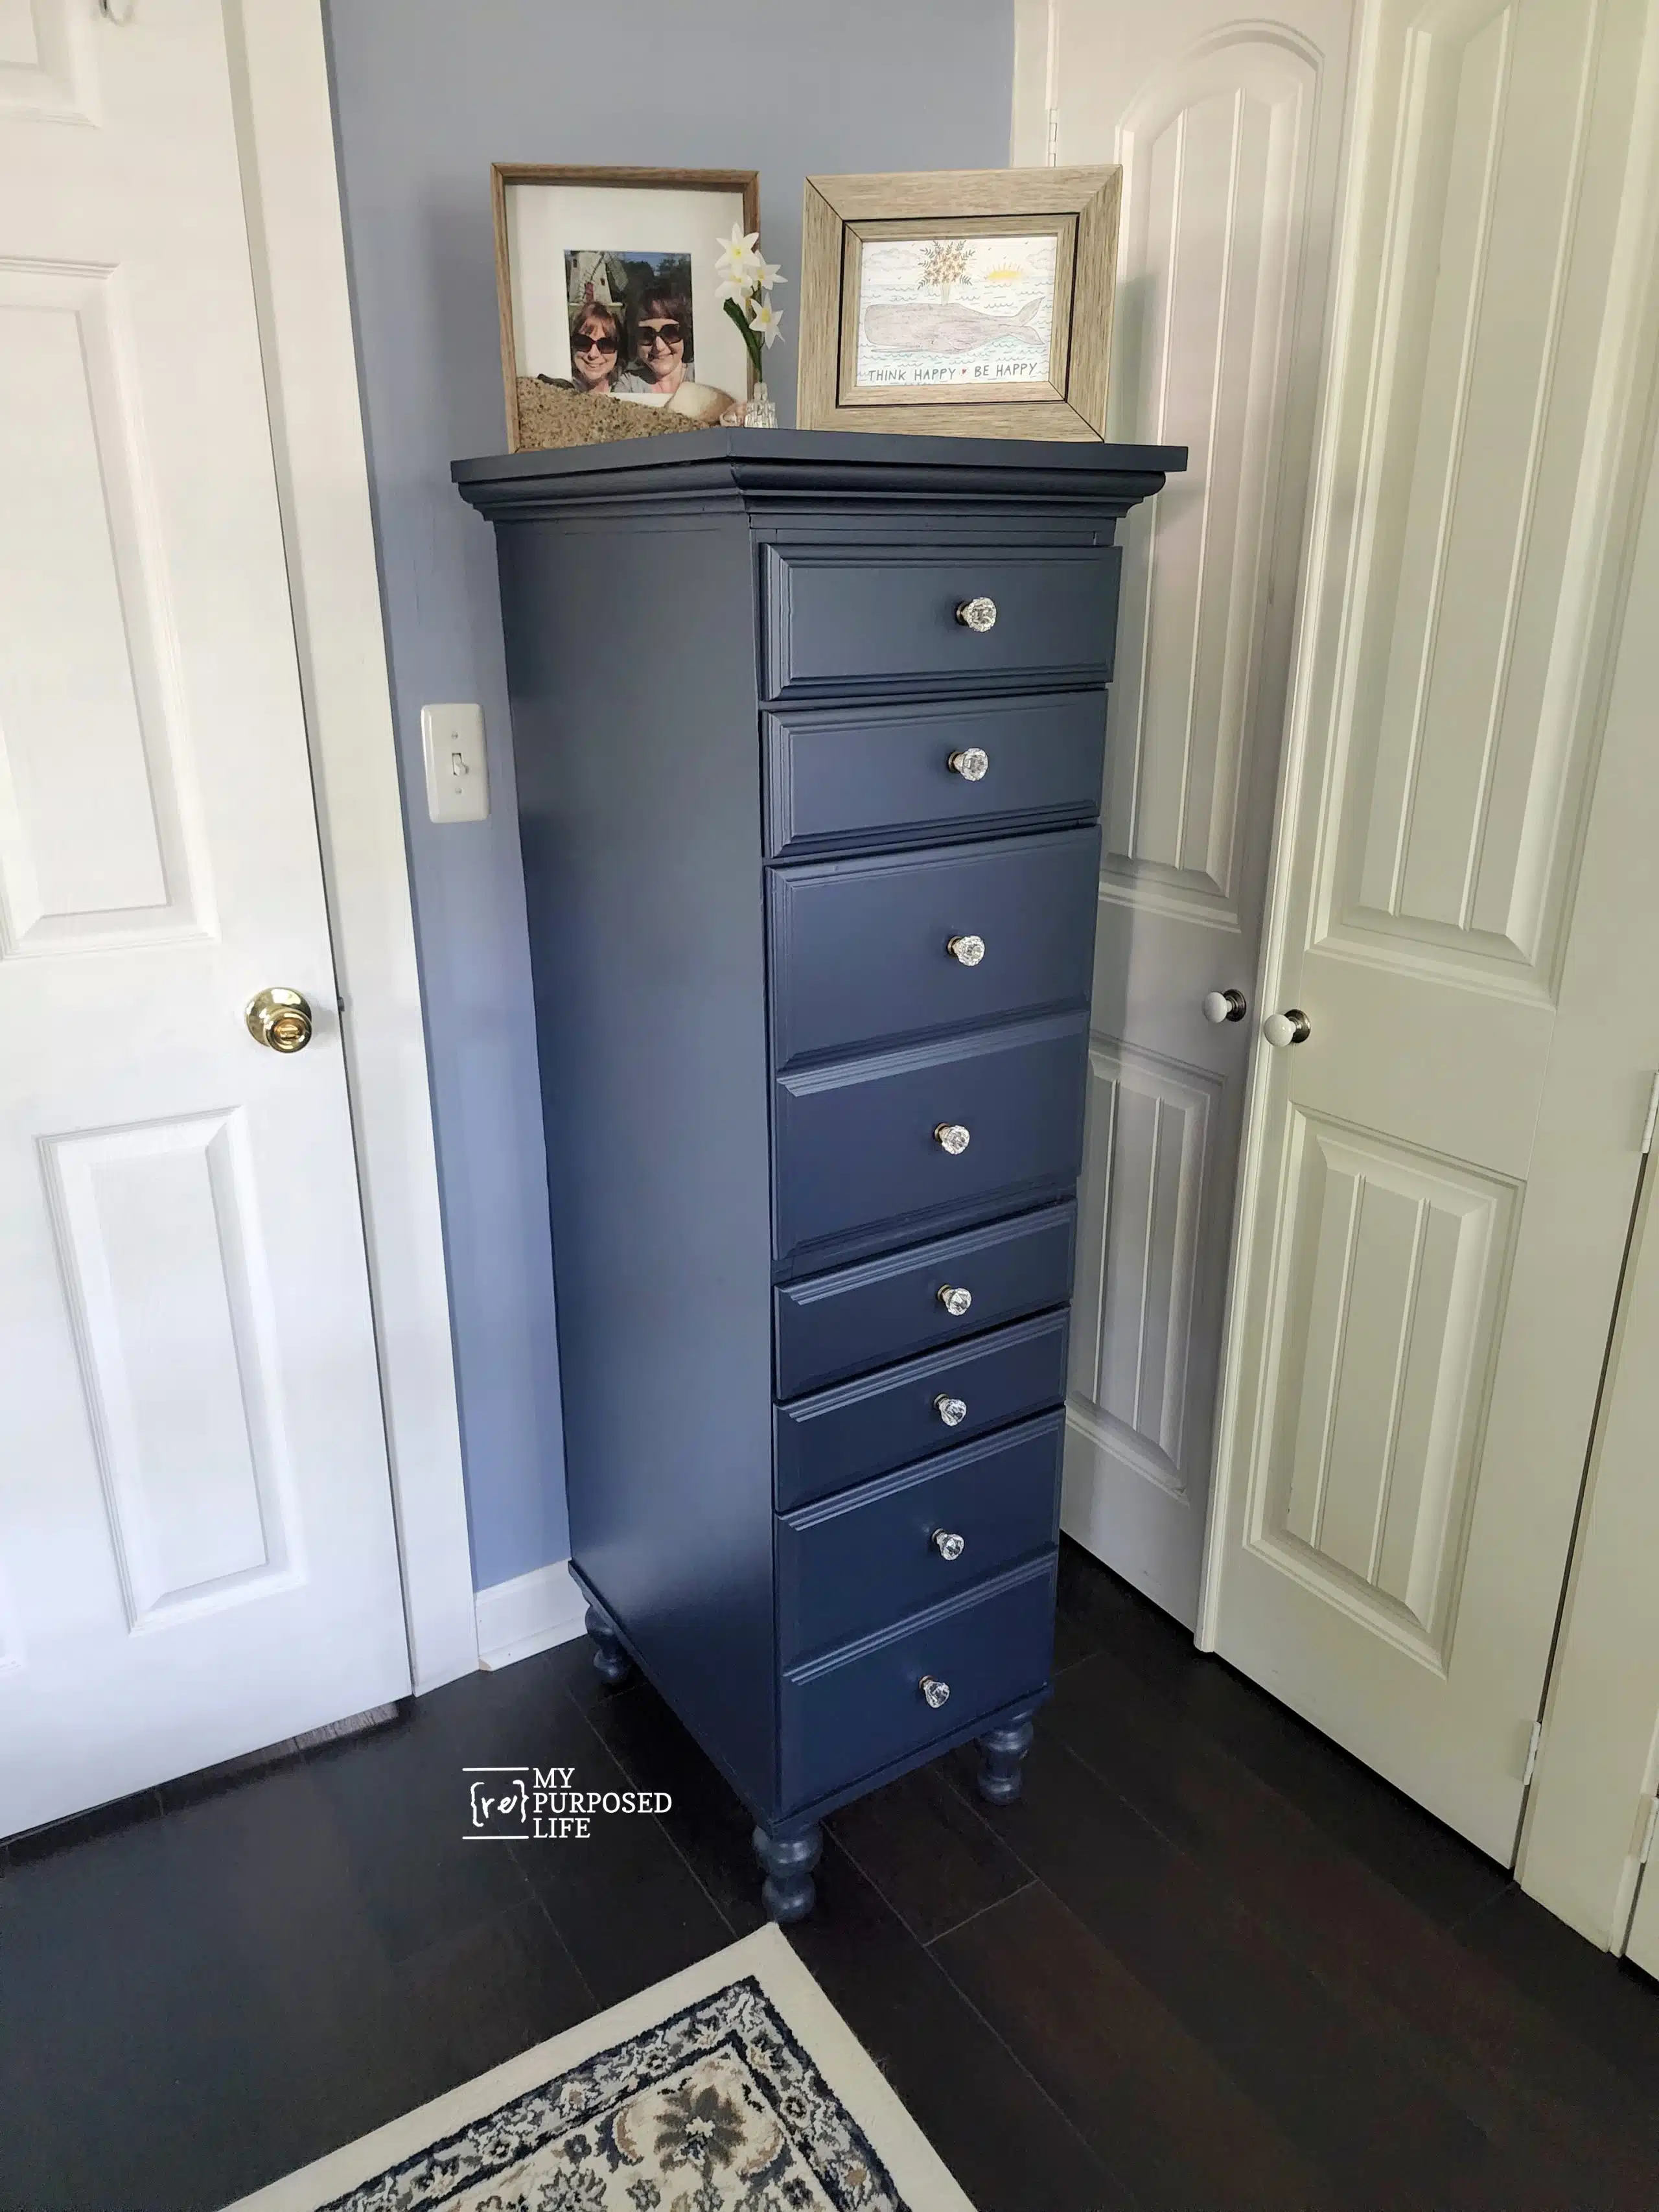
You can see that although there are actually SIX drawers from the original repurposed desk. I like that the two very deep drawers appear to be two rather than one. Therefore I put EIGHT knobs on this chest.
This repurposed desk turned into a lingerie chest can be multi-purposed. I'm unsure which room it will land in, nor what I will use it for. It can be used for office/tax papers, lingerie, or even jewelry. The deep drawers could hold file folders if used as a file cabinet. If used to organize accessories, the smaller drawers could hold belts, while the deep drawers could hold handbags or boots.
What would you store in the "tower of terror?"
Edited to add: I have placed this beauty in my bedroom. The larger drawers hold some boots. The smaller drawers hold all my blog stationary stuff like business cards, stickers, etc. The top drawer holds my orphan socks, the ones the dryer didn't eat!
Okay, now for the update! I still use this upright storage in my bedroom. It seriously doesn't get any better than this for storage. All that drawer space with such a small footprint!
Black Lingerie Chest made from a Desk
I still love this storage solution as much as ever, but I built it in 2011!
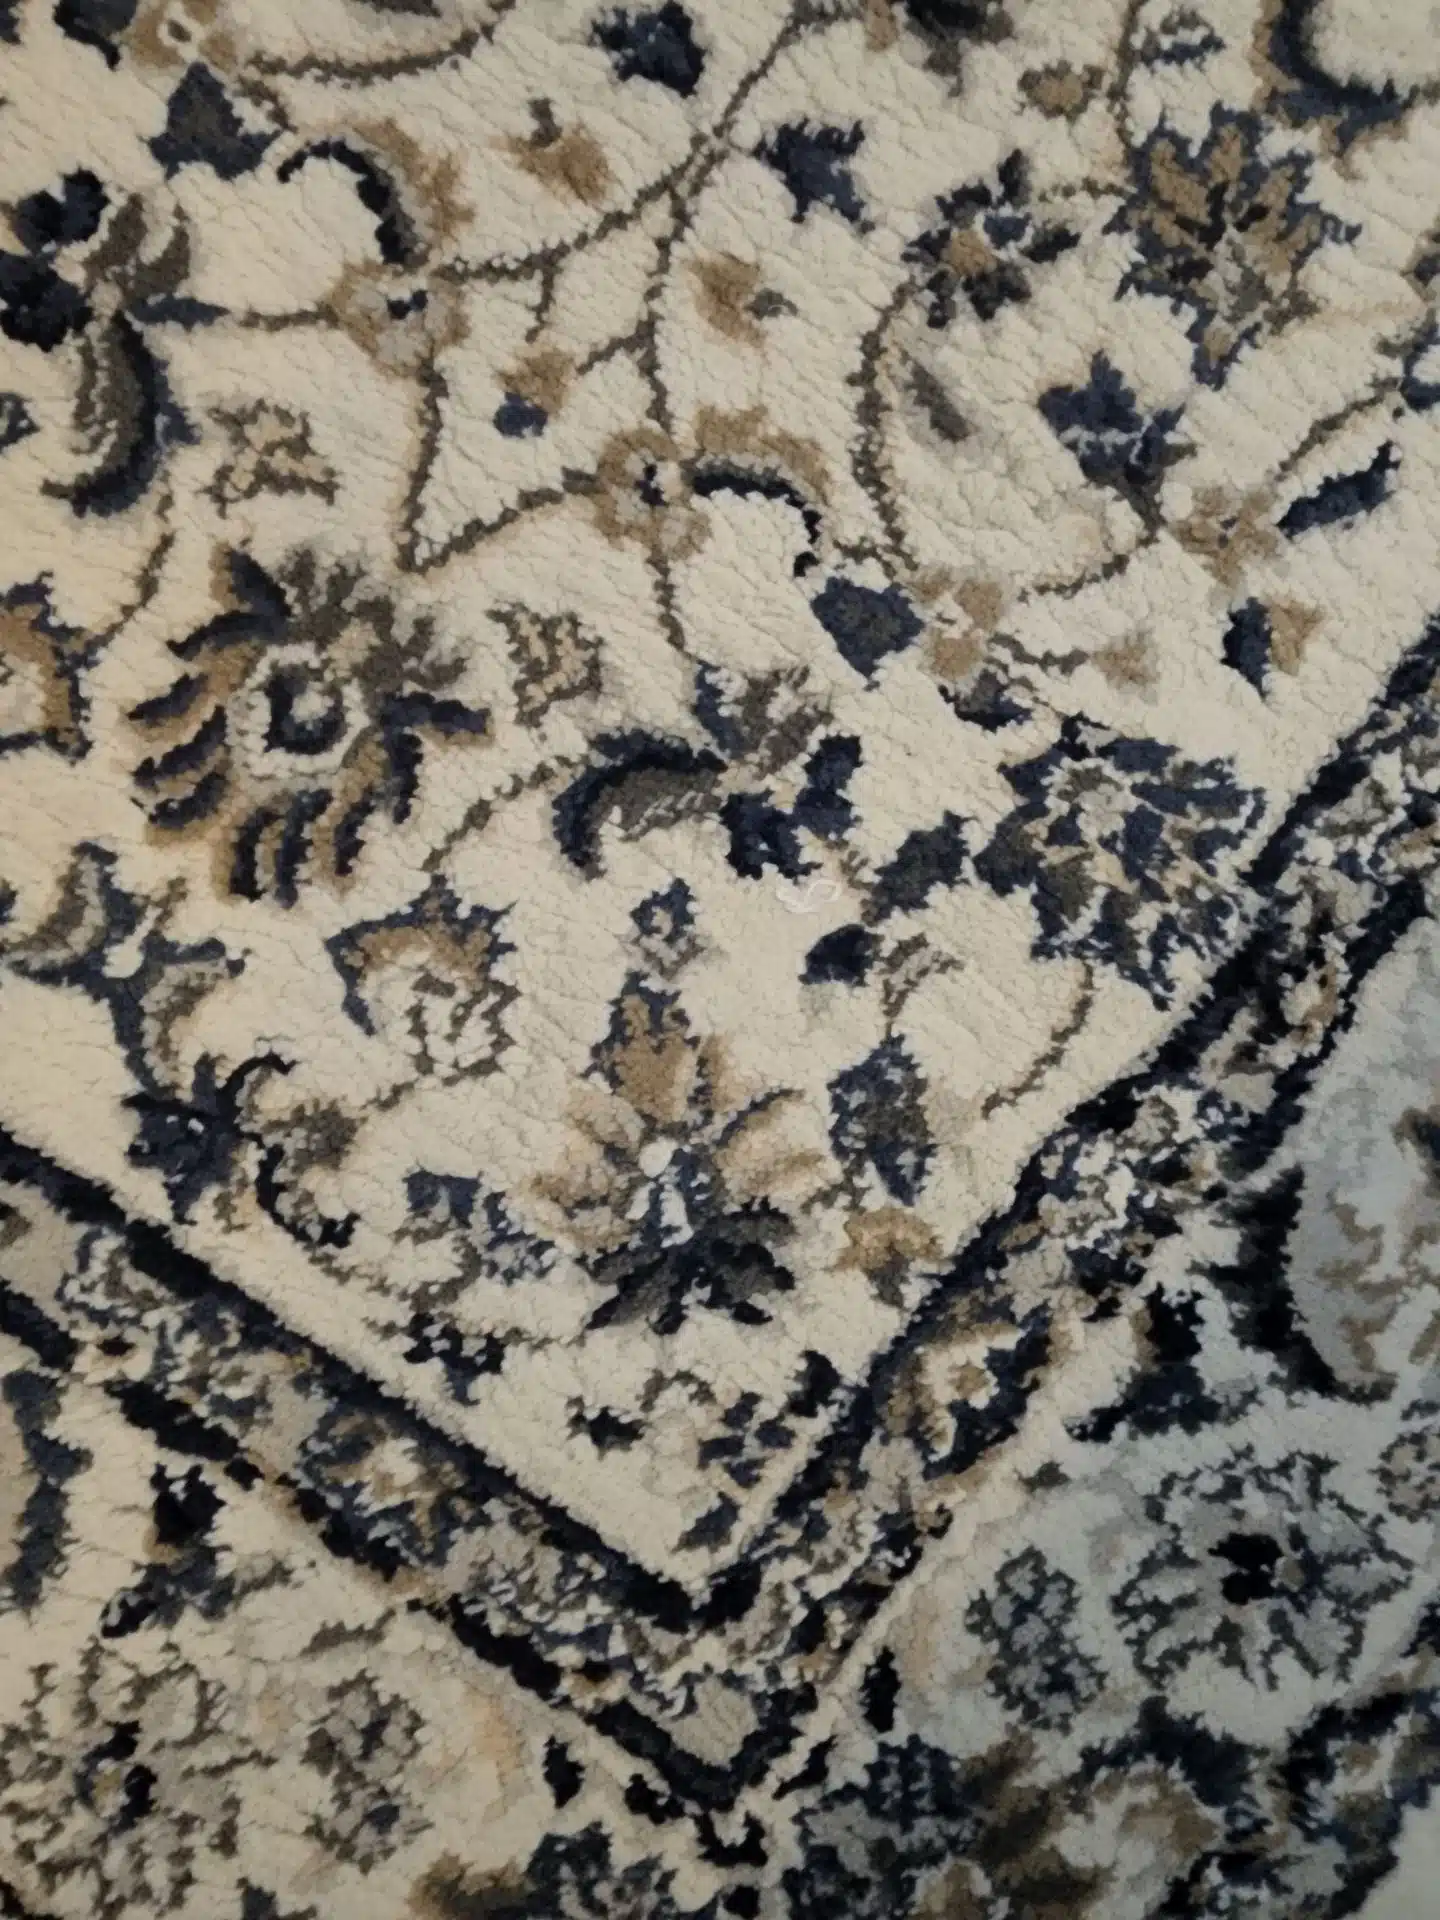
This is my current throw rug in the bedroom. It's from IKEA, but they probably don't have it anymore. I keep things for years and years when I love them.
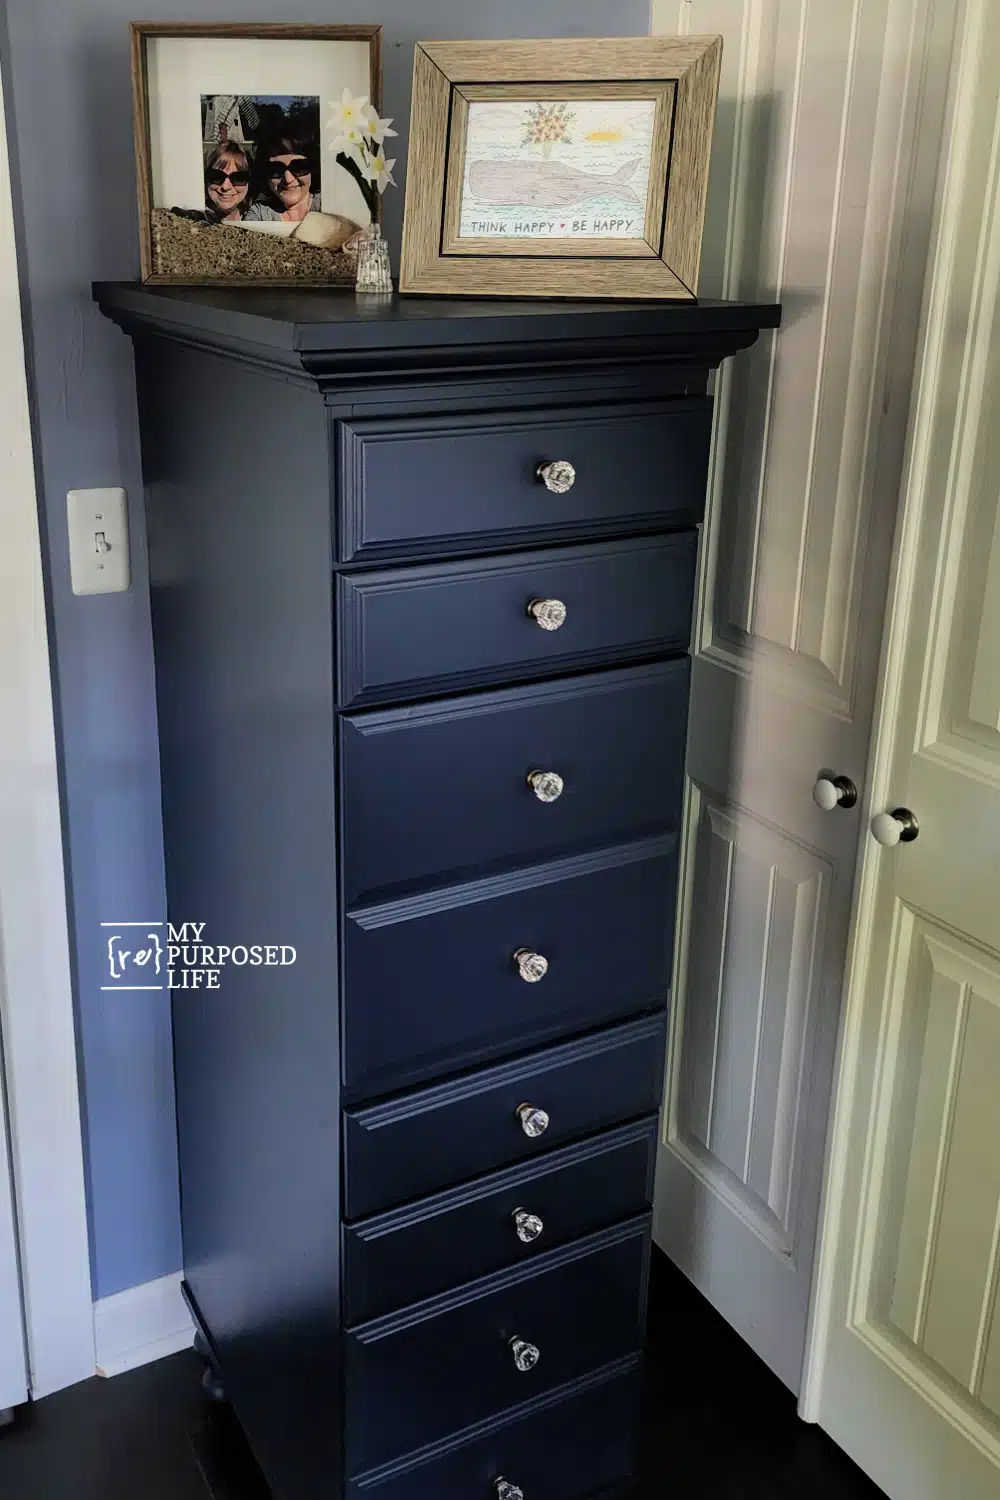
A few days ago, I posted on Facebook asking what color I should pull from the rug. The choices were dark blue, gray, or off-white. Weeks ago, I decided to paint it Polo (navy blue) but as I started working on it, I had second thoughts. Many, many people said dark blue. I think gray came in second.
So, I stuck with my original plan of Polo. After all, I bought a quart for this project, I should use it, right?
Easy Paint Makeover
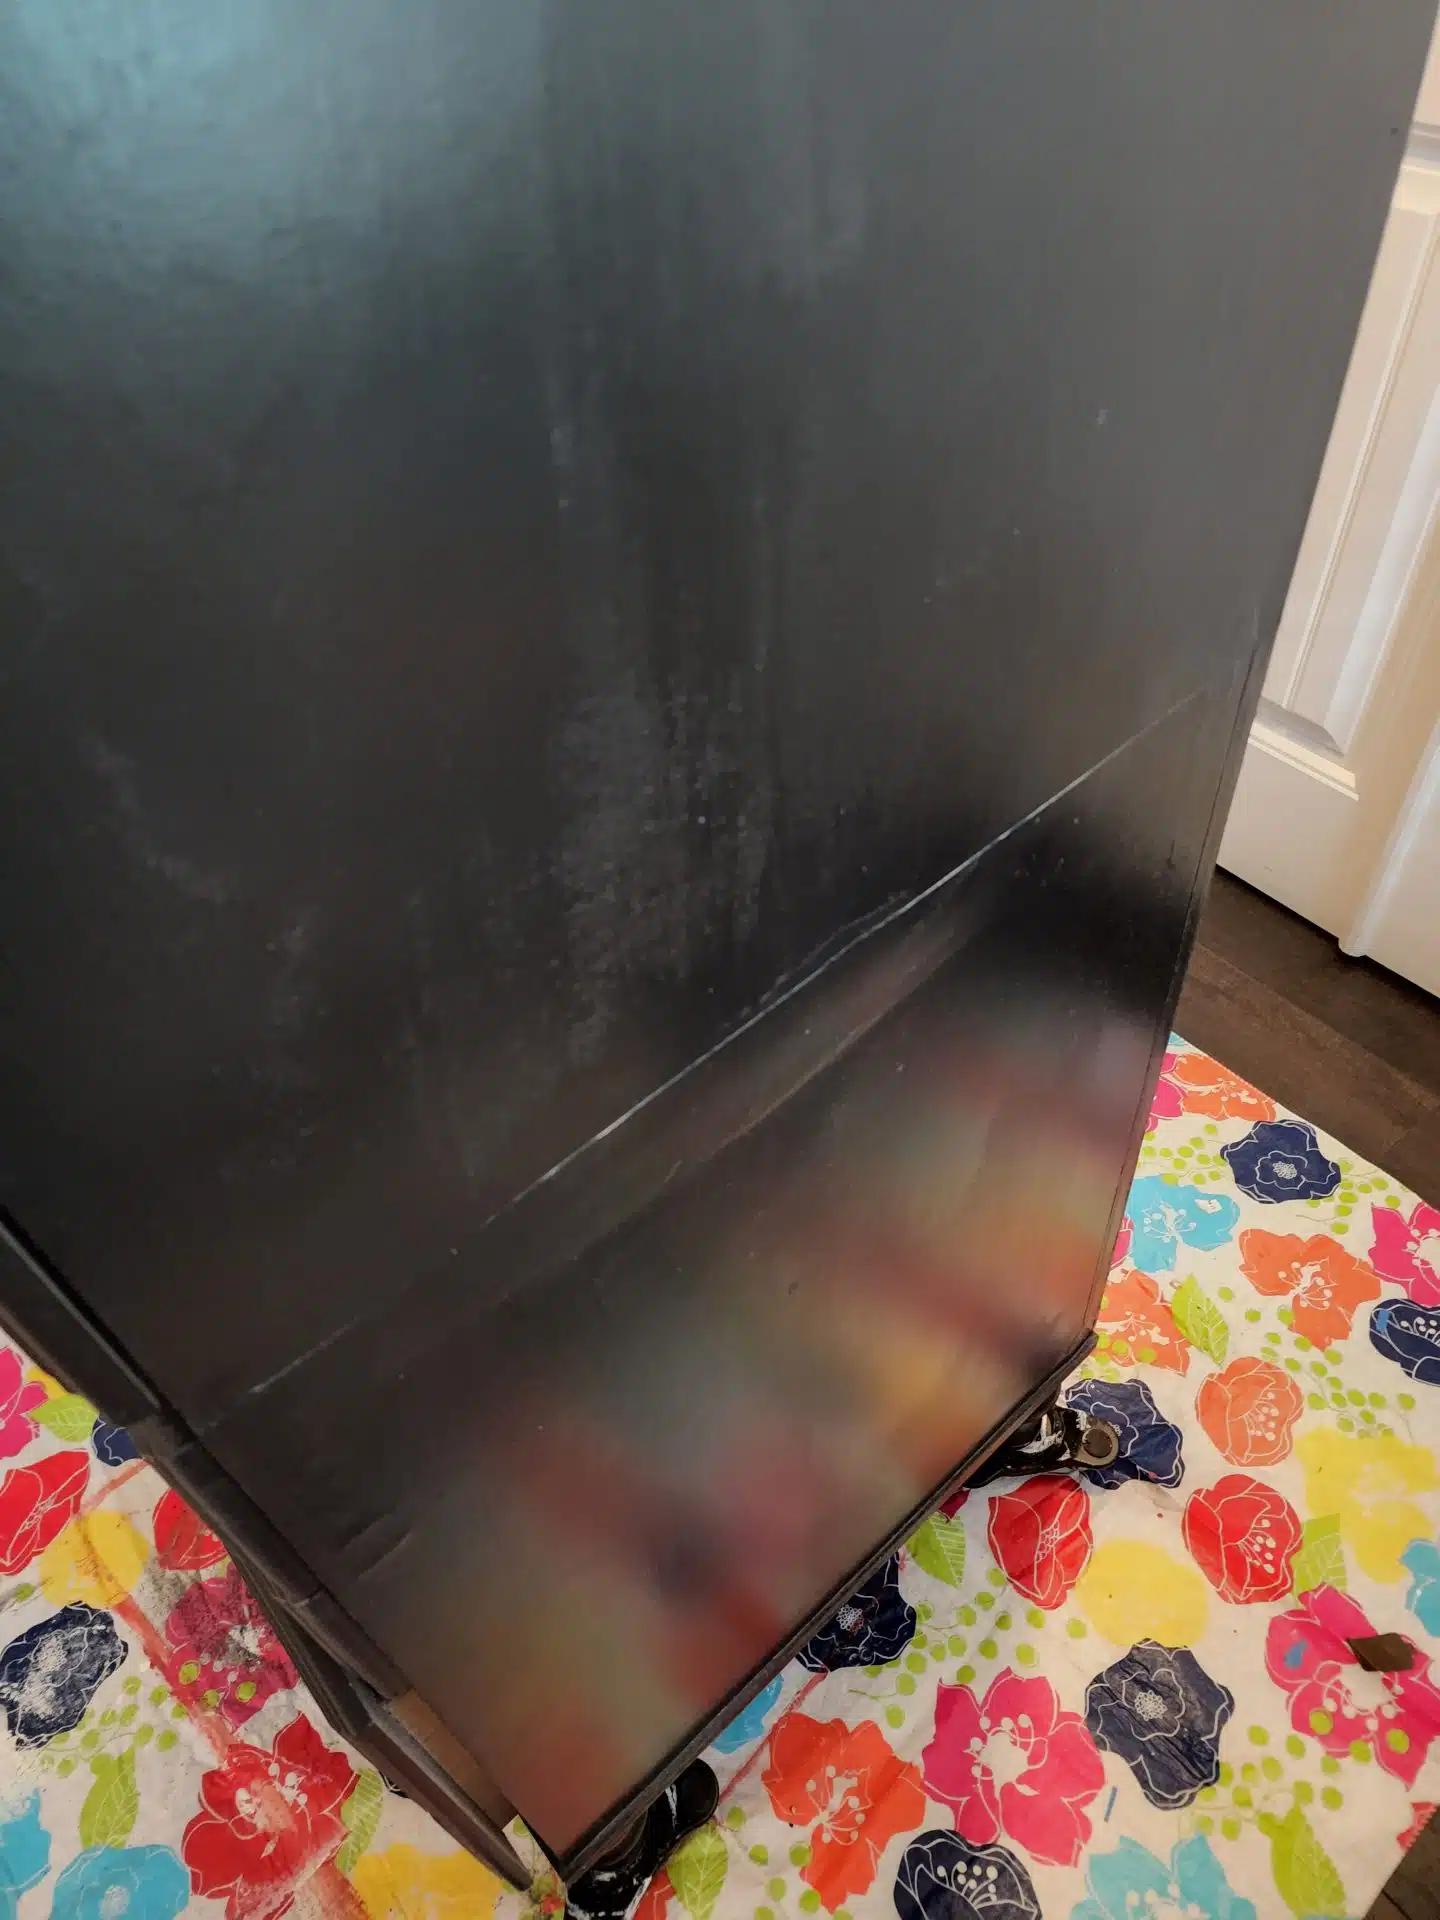
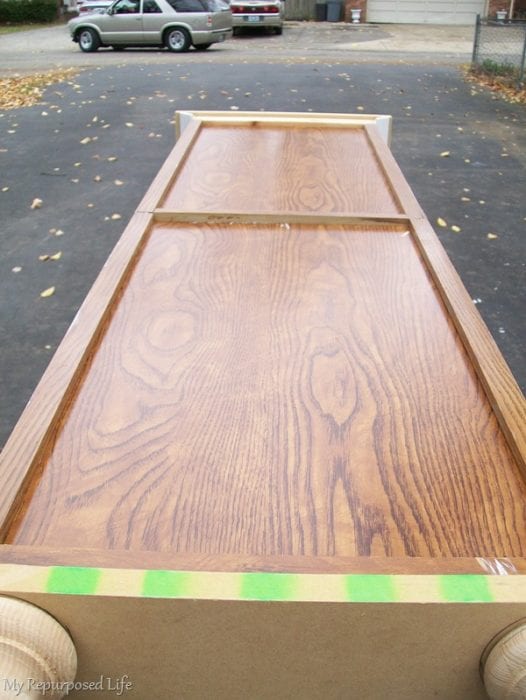
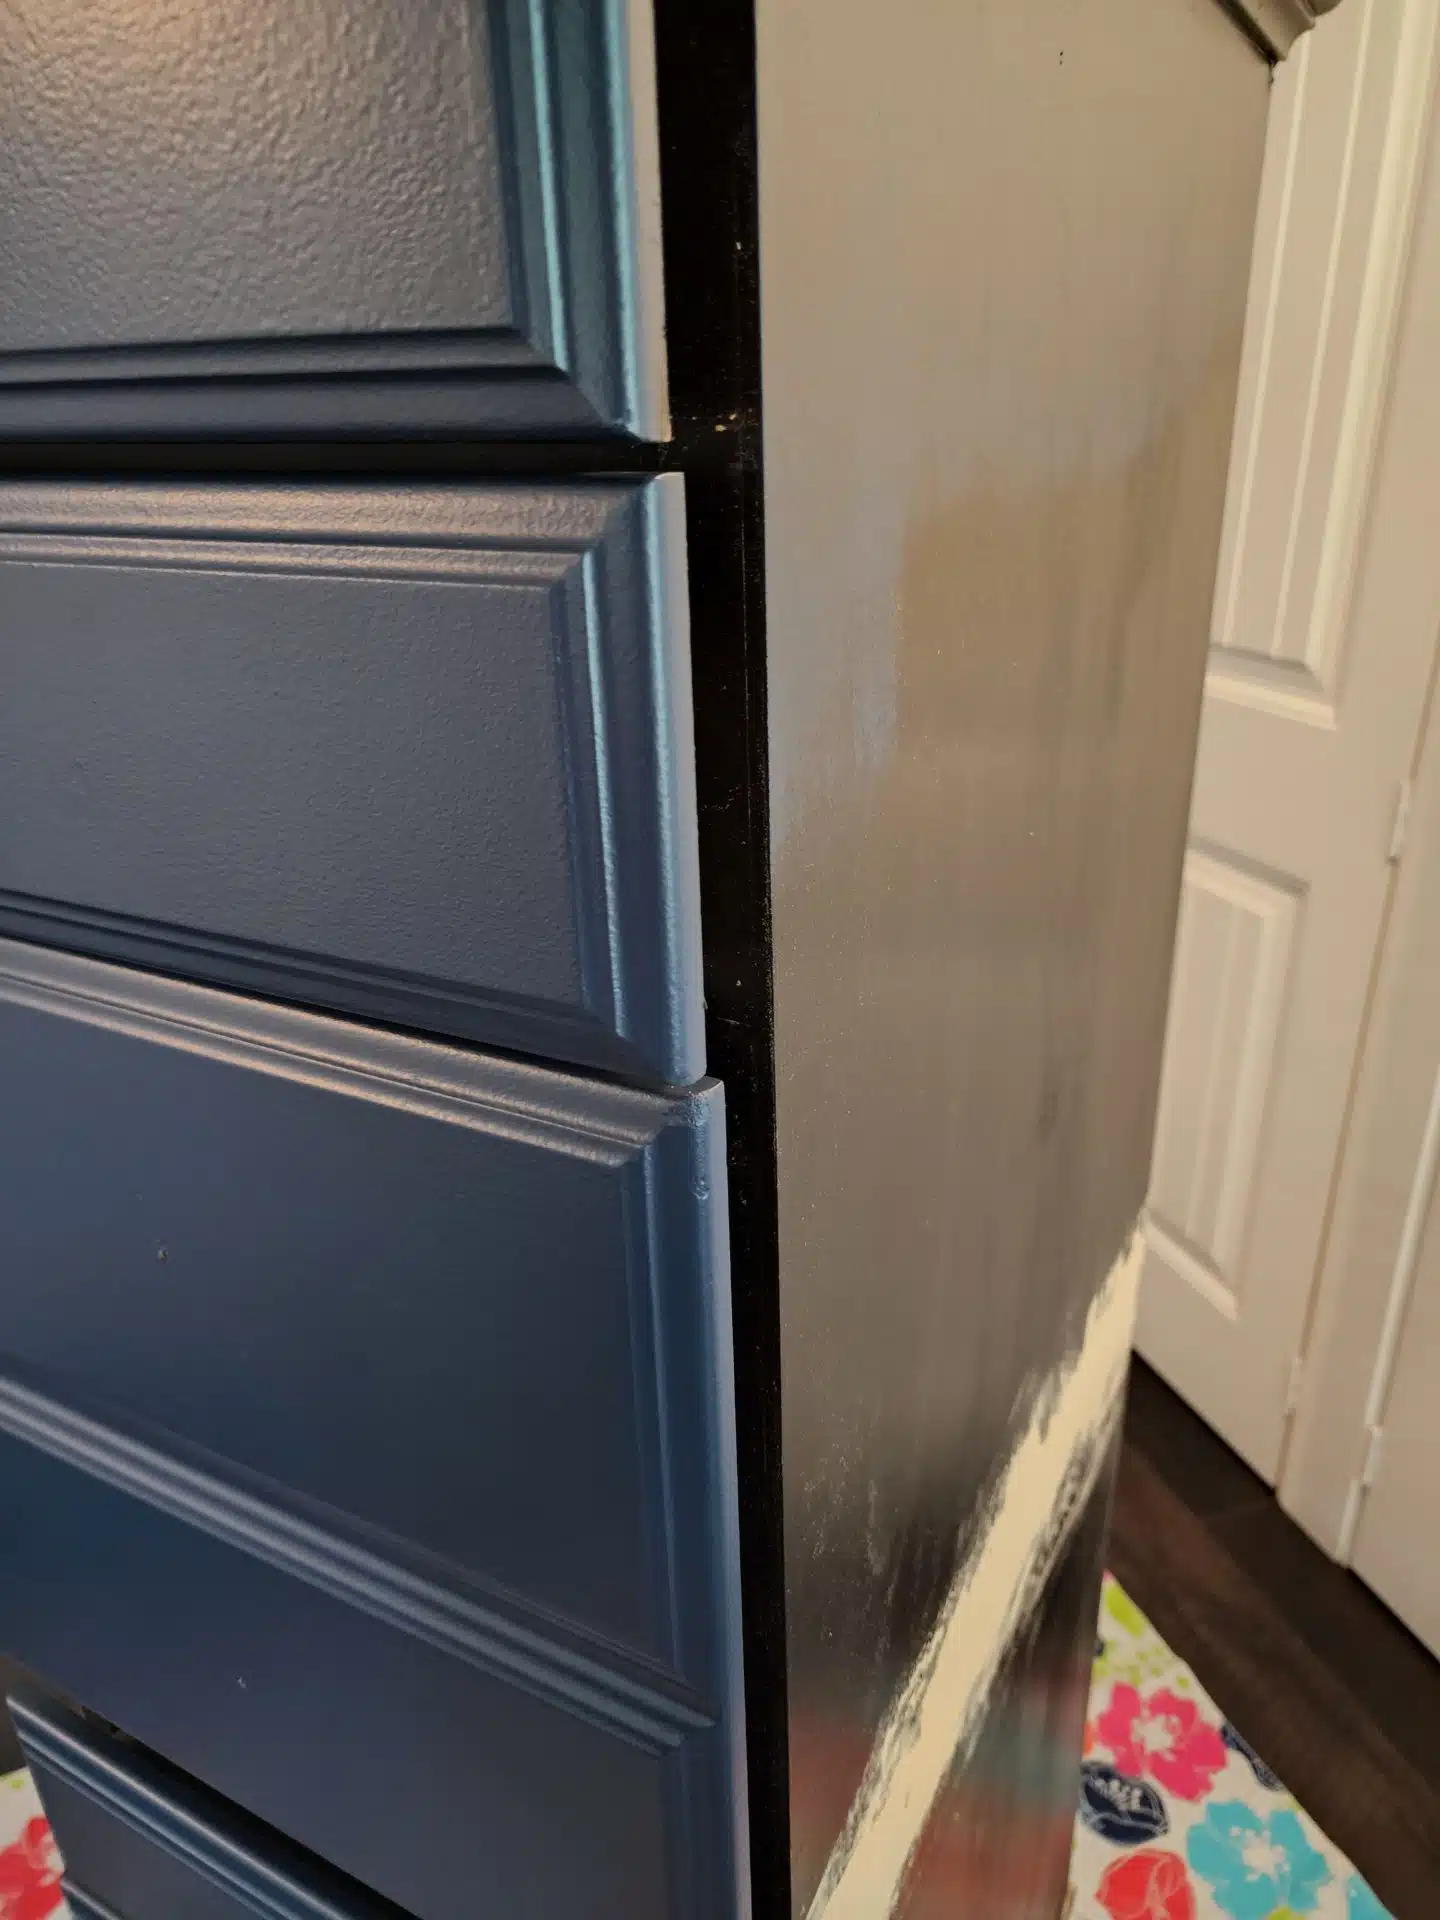
It's always bothered me that the "joint" where I connected the two drawer sections was so visible. Well, I guess it didn't bother me THAT much since I've never done anything about it. You could add thin plywood along the entire length to hide the seam. That would make this a much easier project for a novice.
In this photo, you can see I've already patched the side and started painting the drawers in place. Because it was so hot outside, I opted to paint this lingerie chest in my bedroom.
Honestly, when I started with the drawers, I still wasn't 100% sure I would go with blue. I use All in One Paint from Heirloom Traditions., always doing a very light first coat after prepping the piece to get the best look. I sanded the stenciled drawers lightly to keep the flowers from showing through on the final coat. You can see they are still visible after the first coat.
Related Content: Navy Blue Furniture Projects
Foam Roller for Painting Furniture
I used my small foam roller for 99% of the lingerie chest. A small paintbrush was only used in the corners.
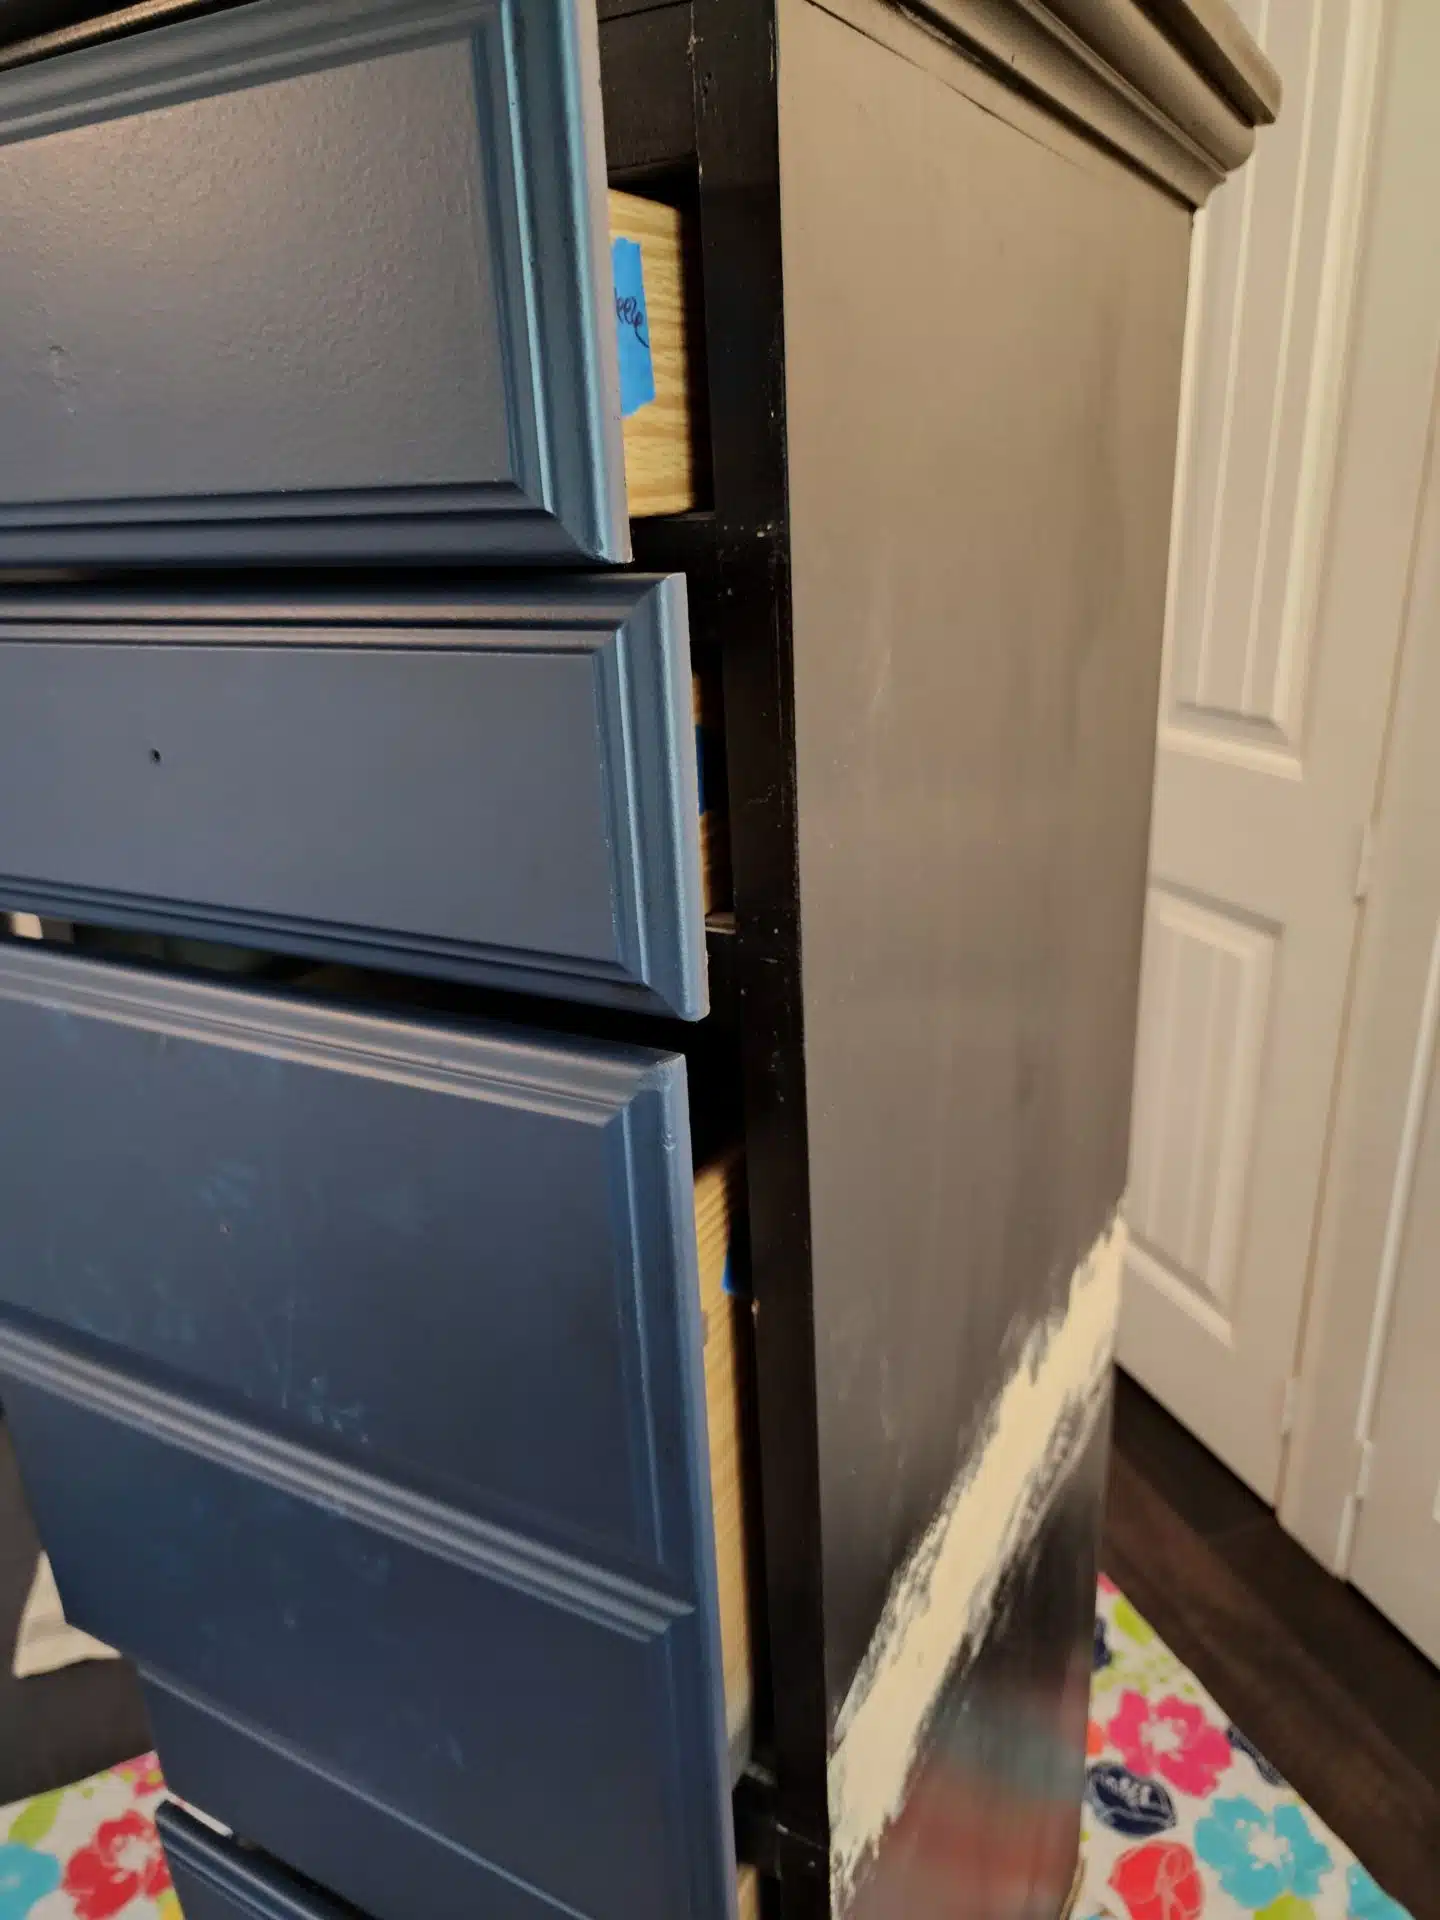
This image is after a second coat of Polo on the drawers of the lingerie chest. You can see I sanded the seam, and it's almost ready to paint.
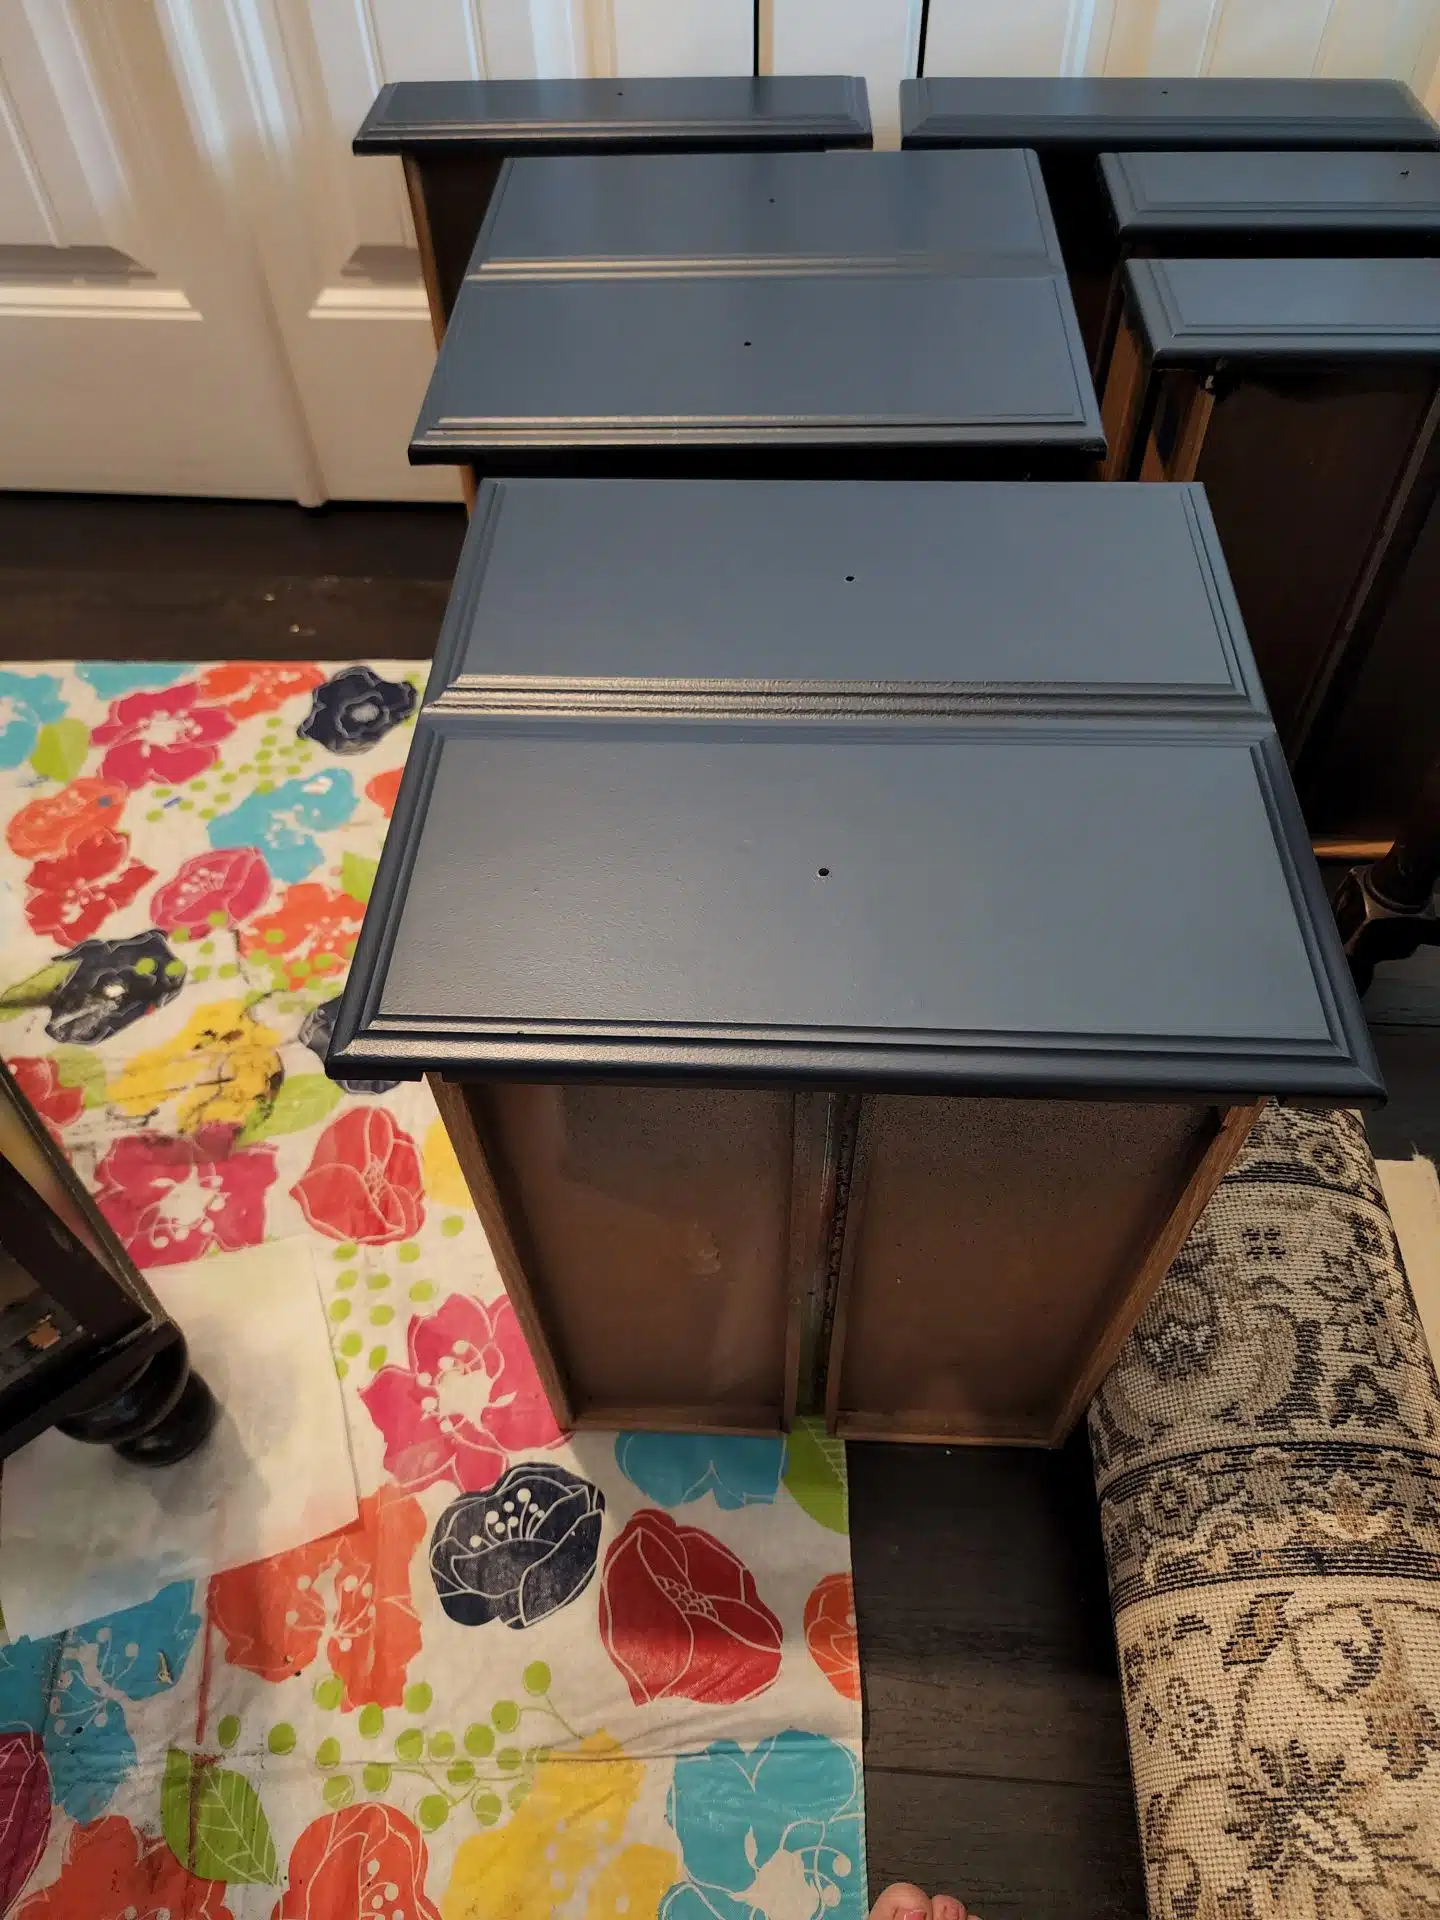
After the drawers were dry, I removed them to paint the facing and the rest of the lingerie chest.
If you remember, the top is MDF, so it doesn't paint up very well. Notice the parchment paper under the feet to keep paint off the floor. It's time to let the paint cure a little before doing one more coat on the top and sides. The small drawers got 2 coats, and the larger drawers got 3 coats.
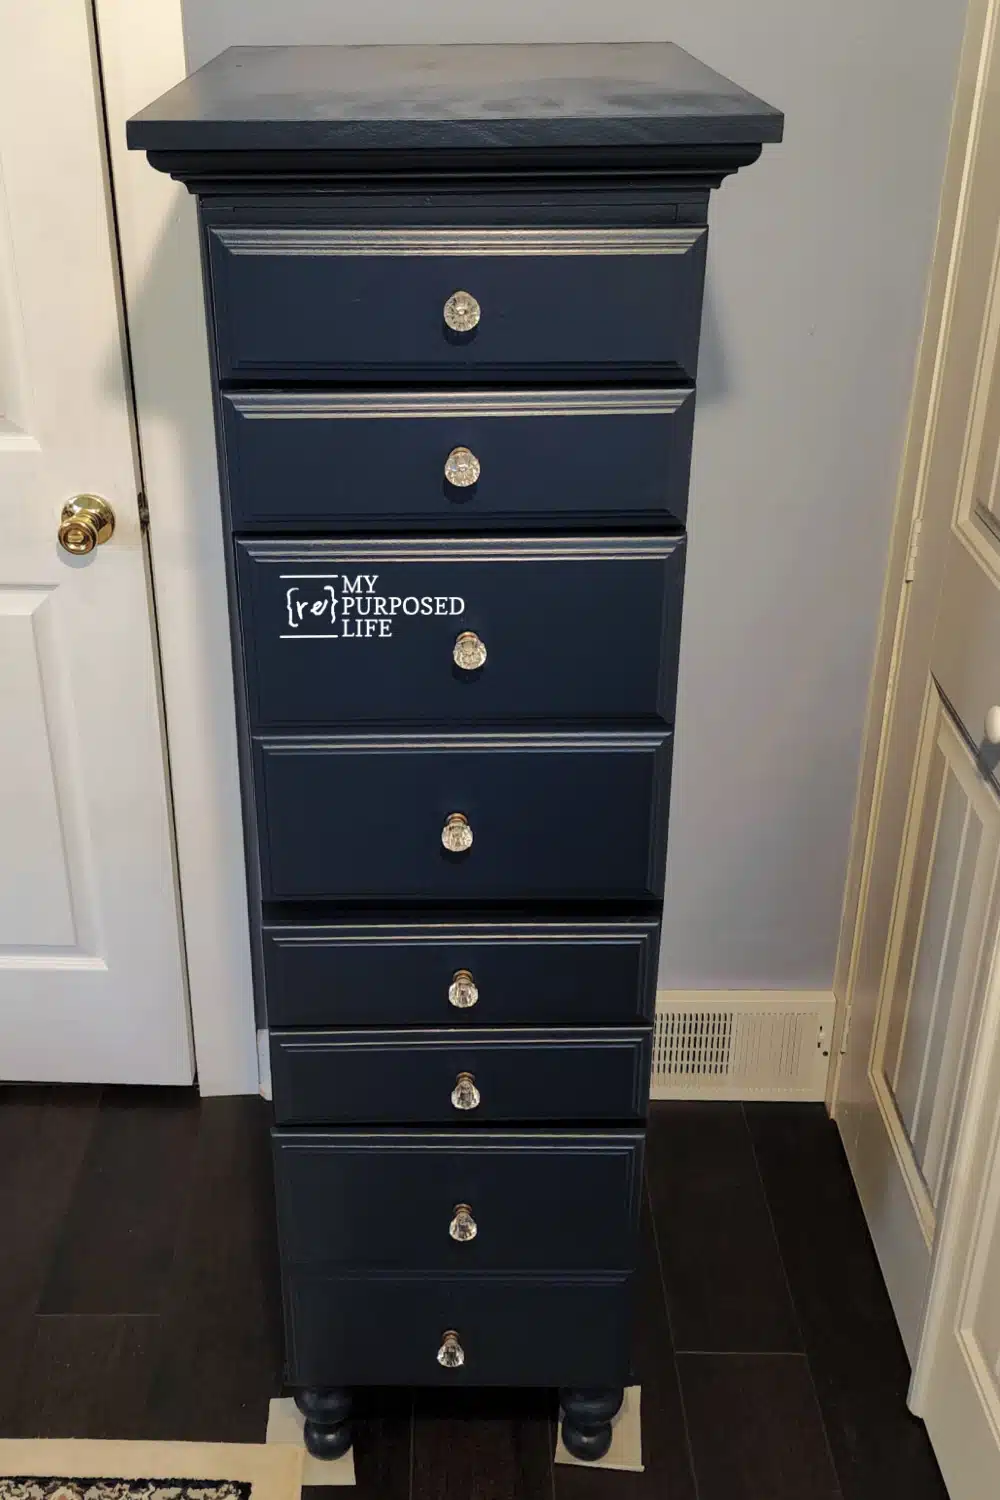
Now, the makeover is complete!
Blue Storage Chest Made from a Repurposed Desk
Personally, I think the lingerie chest looks right at home now, much better than it did before.
Items atop the tall chest are a few favorites from my trip with my daughter Jamie. On the left is a keepsake shadow box I made with mementos of the trip. On the right is a postcard I picked up from an artist in Nantucket. The small perfume bottle is left over from projects I made back in 2009.
What do you think of the new color? I'm seriously ready to make another project out of a repurposed desk, what about you?
gail
Related Content: More Upcycled Desk Ideas
Sharing at Funky Junk Interiors
Gail Wilson is the author and mastermind behind My Repurposed Life. She is obsessed with finding potential in unexpected places and believes that with a little hard work and imagination, any old thing can be made useful again, including herself!
Gail reinvented herself during a midlife crisis and has found purpose again. She hopes you will find new ideas for old things and pick up a few tools along the way.
Tania
That is so cool and what a great idea!
Tania
Gail Wilson
Thank you Tania. I re-home many of my projects after I do the tutorial. But this is definitely one of the favorites that I've kept!
gail
Janette
I think this was a brilliant idea, never seen it done before but I love it and both ways it was painted too.x
Gail Wilson
Thank you Janette!
I've never seen anyone do it before me or after me! Thank you so much for stopping by and taking the time to leave a comment.
gail
Erica Smith
OOOOMGOSH how clever!! This "new" cabinet turned out perfect! Great job!! A new buy would be sooo expensive! Love flippin pieces into something new and especially pieces that hold special meaning to us!! Thanks for sharing your wonderful ideas!!!
Erica
Gail Wilson
Erica,
Your sweet comment put a big smile on my face! Thank you so much. I'm thinking about updating the paint, a navy blue. I think it would match my bedroom better. Although I've loved the black with the stenciling a lot!
gail
Cheryl
Wow!! Would never have thought to do that. Love love love it!!
Gail Wilson
I've never seen it done, before or since! 🙂
I have no idea how I came up with it.
thank you for your sweet comment!
gail
Mike bartley
I use industrial Velcro to attach things that I am afraid to drill into. It is very strong .
Pamela
This is so dope! I love it!
Gail Wilson
Thanks! It's still one of my all-time favorite projects. I'd love to make another someday soon.
gail
Kathryn Gutierrez
This is wonderful. I am going to sale an old desk on craigslist soon. I just have no more room even for a smaller item. I do have an old metal Army footlocker that was my father's, he was a 30 year veteran, that I want to put casters on but I'm reluctant to drill holes to hold the casters or cleats for the casters. Any suggestions on how to attach the casters without changing the integrity of the footlocker?
gail@myrepurposedlife.com
Kathryn,
I really don't have a good suggestion about attaching casters without drilling or screws. You can see how I did one here: https://www.myrepurposedlife.com/army-footlocker-coffee-table-storage/
Wishing you the best of luck.
gail
Kim
How about making a shallow tray with wheels on it to set the foot locker IN so you don't have to add them ONTO the footlocker itself?
Gail Wilson
Kim,
That's a fun idea! I'll have to remember that for my next project that needs wheels. Thanks!
gail
Teresa
This is such a neat idea. You really are very good at these projects. I love looking at your ideas and finished projects. Thank you for sharing.
gail@myrepurposedlife.com
Thank you Teresa. I still use this every day, and I love how little space it takes up. 🙂
gail
Mona W.
Wowza Gail! This is gorgeous! I love it! You are a genius at these re-purposing projects. Truly inspirational. The little glass knobs remind me of the old house I grew up in. All the door knobs were glass. Brought back memories. PS I live in a small mobile home and space is always an issue, so going vertical is always my way to go because of the lack of floor space. 🙂
gail@myrepurposedlife.com
Mona,
I'm so happy you found this blog post. I love this and still use it almost every day.
gail
Kim
Wow! Beautiful piece! Your creativity and abilities are just over the top. I am so fascinated by your projects but to timid to try this on my own. Maybe someone in my area will give a repurposing class one day. ?
Donna atkins
Beautiful, I agree with using two knobs on the deep drawers, looks great. Love the stencil, the design is just enough to make a statement . Job well done and a beautiful piece
alison
Love this project top to bottom! When I first saw the pic I thought I want that piece. I love re-purposed pieces but this one seemed too nice to not be purpose-built. I've eyed lingerie chests but this one would store so much more, especially in my tiny house. Now I'm going to be eyeing garage sales for cheap double pedestal desks, and plotting stenciling for my existing bedroom pieces.
gail@myrepurposedlife.com
Thank you Alison!
This is still one of my all-time favorites. It's in my bedroom and I use it all the time.
I've always wanted to make another, but haven't found the right desk!
thanks for stopping by and taking the time to leave a comment.
gail
rebecca
All the comments telling you how lovely, awesome and perfect this piece is -are all true. If you are near the Newport , WA area, I have a desk I will give you. Would love to see the next one you do.
gail@myrepurposedlife.com
Rebecca
Thanks for stopping by and taking the time to leave a comment on this project. It was a fun piece to do. I'm in Louisville KY, but I thank you for the offer of the desk, I'm always up to a good challenge.
gail
Carol
Brilliant idea, one of the best I have seen. Thank you for the how to instructions. I am looking at a couple of water damaged pieces with new eyes!
gail@myrepurposedlife.com
Thank you Carol, so happy you stopped by My Repurposed Life!
gail
Deb B
I love your repurposed desk turned tall chest and I think it's by far the best idea yet that I have come across, it looks fabulous.
You did an awesome job I must say, I also love the stencilling.
I am presently eyeing an old wooden desk someone has disposed of because the top is damaged and coming off.
I have been looking for ways I could possibly repurpose it as the rest of it is in good condition and is solid wood.
While looking for ideas I came across a picture of your desk turned chest and your blog on how you did this so I think I'm going to give this a go.
Thank you for sharing this project with us and all the how to instructions.
Deb B
Linda Lehman
I really like this! It is so useful, which to me is highest praise! I had a huge desk like this at work and always loved it but it was so large, I couldn't really use it well. I think I have to go look into the attic and see if we kept it! This would be perfect in my little house!
Thank you!
girlfromwva
still an all time favorite project!!!
Mona
So far, this has been my favorite project.
We did this once to a credenza, making a useful filing cabinet. Ours did not turn out this great, however, because we didn't finish it out to the extent that you did. Ours was strictly utility.
Rachel Lewter
OMGosh, I want a work shop SO bad!! What an inspiration!!
gail@myrepurposedlife.net
Thanks so much Rachel. I still use this every day, and love it so much!
gail
jenniferj
So thinking the corner bench was the fave, but after reading other posts, I love this tall cabinet! Have looked for one for some time. Love your ingenuity and recycle. The smaller footprint is perfect!
Dawn Stagg
Gail, this project is #2 on my list of to-dos right behind doing a headboard to bench project. I talk about this more than any other project. So ingenious!!! I am still looking for the perfect desk for this. I find ones that are too nice(pricey) or too far gone.. I also want to find the perfect place for it in my home. I may have to build it, and once I see it, know where the perfect home will be. It's between my bedroom, and the guestroom, but I could use one in my sewing room. In my wanderings looking for the right one, I keep seeing old entertainment centers (kid kitchen potential - can't get that one out of my head either!!!).
Bobbie
This is THE most awesome re-do I have ever seen. I can't wait to tear into some of my yucky furniture to turn it into a gorgeous make-over like you did. Thanks so much for the inspiration!
gail@myrepurposedlife.net
Thank you very much Bobbie! I appreciate your kind comment. Good luck with your furniture redos.
Have fun, be safe!
gail
Sally
Hi there . . . Just stumbled across this site today (always late!) but wanted to congratulate you on such a wonderful outcome. Gee, I wish I could think outside the box. 🙂
gail@myrepurposedlife.net
Thank you Sally! One of the few pieces I've kept. I love it still
gail
Cindi
"The top drawer holds my orphan socks…you know the ones the dryer didn’t eat!"
Oh my, I thought I was the only one that had a drawer like that rofl....
Sue
Love this! And have my eye on a similar desk at St Vincent de Paul that I really want to get and do this! Question: how did you get the top off and cut the desk apart? That's the part that has me a little leery. I'm thinking that I also want to remove the two small drawers on the top of each side; one is damaged pretty bad. Would love to take on this project if I can get my courage up 🙂
gail@myrepurposedlife.net
Hi there. Thank you for your kind comments on my project.
If you look under the desk top you will probably see that it has screws to hold the top on. Remove those screws and the top should come right off. I've done that with several desks and they all have screws underneath the top.
If you have any other questions I'm always here to answer them for you.
Good luck! Have fun
Gail
Bonnie Earnhardt
I have a large, solid wood entertainment center--the kind that was used for those huge tube-type TVs. I would love to figure out how to make it into 2 nightstands. After reading your great post, I'm definitely going to put some energy into trying to make that happen. If you have any suggestions/ideas, I'd love to have them! Great post, and thanks for the inspiration!
gail@myrepurposedlife.net
Bonnie--I'd have to see pictures to advise you. 🙂
Happy to inspire you!
gail
tmcarthur57
Great job! Thanks for the long post, pics, and tips from your experience! I've got a desk perfect for this project... just have to get the nerve to attempt it! lol
Gail Wilson
Yay! I'm glad you are inspired to make your own! 🙂 I'm here if you have any questions. good luck, have fun!
gail
Linda
Susan Forsythe
O...M...G...! Be still my heart!!!
Infarrantly Creative
OMGoodness! This is fantastic, perfect and completely "outside" of the box. Tremendous job!
Debi Martin
Great Job!!! I love making something from nothing lol. Just a little FYI for a fellow DIYer. Hobby Lobby carries knobs and if you watch they have them for 50% off sometimes. I bought all new knobs for my kitchen and I got all the drawer pulls and knobs for under $40.00 Just thought I would share
Wanda
Oh my goodness. I'll be on the lookout for an old desk now!
Jo Anne
This was a great, new idea with excellent tutorial. I love high chests and this is really cool. NRN.
Audrey
Beautiful ... great job
Blessings,
Audrey Z. http://audreyzumwalt.blogspot.com/
Timeless Treasures
Anonymous
LOVE IT WANT ONE
Anonymous
Wonderful idea!! And excellent job!! Love it!
NRN ~ Lisa
Jill
That is so gorgeous, I love the black and white. And the end result compared to what it started out as is just amazing! I would love to give a project like this a try, not sure it would turn out quite as well though!
Anonymous
Awesome idea! I have a srudent teachers desk in excellent condition but is too big for us. Unless I figure out how to make a kitchen island, not sure what to do. Never thought about sawing it in half. 2 end tables would be perfect! Thanks!
Jennifer...jmcorazza@yahoo.com
Tisha
Amazing! Your creativity is so inspiring, and your tutorial has some great tips! I bought some feet to attach to an old dresser, and I'm having trouble with them staying secure - but it never occurred to me to mount them on a solid piece of MDF and set the whole thing on top! I'd love it if you'd share this at my Show & Tell party, going on now @ the Delectable Home.
driftwoodesign
Way to go Gail, you did a fabulous job!
Kristy @ 4 the love of WOOD
Good Time Charlie
Thanks again for sharing Gail, I am sharing tomorrow at my party!
Michell @ Girl In Air
Gail I'm not sure if I got a chance to stop by and tell you how amazing this project is....WOW! So inspiring...I hope I get time to do something like this with the many pieces I have in my garage..
Good Time Charlie
Gail this is amazing!!! I truly cannot believe what these pieces started out life as. Congrats on making top 10 at DIY club. I would looove it if you linked this up at my party today. It is my idea of a fantastic Redoux!
Holly Lefevre
That is a fantastic repurpose - it looks amazing - great save on that desk!
Lillie
This very tall dresser is exactly what I have been searching all over for, to put in my extremely small bedroom. They are so hard to find! And in my search, I landed on your blog. It's amazing that you were able to build this ... I wish it were for sale!
Baye
I'd put in in the back of my walk-in closet to hold all kinds of things! Love this! Maybe this summer I'll give it a try.
Clarissa Emily
Uh-May-Zing! You are such an inspiration! I'll be on the lookout for one of these next time I'm out thrifting! It would be perfect for storing my piano sheet music. Thank you for sharing! 🙂
~Clarissa @ A Little Stone House
Our Delightful Home
You did an amazing job!
~Mrs. Delightful
ourdelightfulhome.blogspot.com
michelle@somedaycrafts
You are more than a repurposing rockstar! You are a repurposing genius!!!!! i am featuring this today at somedaycrafts.blogspot.com.
Chris
Hi Gail, what a fantastic job you did in converting an older desk into a modern "tower". It is absolutely beautiful. Thanks so much for sharing and Happy New Year. I have recently found your blog and am now following you, and will visit often. Please stop by my blog and perhaps you would like to follow me also. Have a wonderful day. Hugs, Chris
http://chelencarter-retiredandlovingit.blogspot.com/
Shelly @A Creative Space
Seriously? What awesome tales you tell! Yep, had my cup of coffee with me, enjoyed the whole story. Wonderful results! About 10 years ago, my poor dresser set was combined, one on top of the other, very basic design. And that was that.
It lives in the garage and still houses tools, electrical cords, etc. Someday, it may be disassembled and allowed back inside... your post has given it hope! Have a great day. 🙂
Lori
You the Bomb! LOL...You really did a fantastic rebuild! Love it.
Allison @ House of Hepworths
You are awesome so I featured you at my Hookin Up with HoH Party!
Feel free to stop by for a button if you'd like. 🙂
xoxo
Allison @ House of Hepworths
SheilaG
Amazing- I love it! This would make a great lingerie/jewelry chest. Love the feet and the knobs, good job!
Jen Lossing, The Consigner Designer
What! This is amazing. I had no idea. So very talented. Great job!
Kim@todayismysome-day
This is just wonderful! Can't wait until I am comfortable enough to remake a piece. Great job!
Kim
http://www.todayismysome-day.blogspot.com
My Indulgences
I'm bookmarking this post in my Inspiration folder. I have the old desk and the perfect place for the "tower".... now I just need the time to make it happen. Looks like the perfect winter project for me after the holidays.
Great post with detailed instructions...much appreciated! Feel free to browse my site if you find the time.
I'll be back!
Lora
Beth
This is ingenious! A lot of work, but so worth it in the end! I adore the stenciling along the front that really sets this piece off.
Anita @ GoingALittleCoastal
What a fantastic was to repurpose a desk! It is nice to have so much storage but not take up so much space. Hope you're feeling better. 🙂
Cinthya
That is an incredible makeover. Wow. I can't believe all the work you put into it. I would like to invite you to my linky party at: http://eyehearttoday.blogspot.com/2011/12/last-weeks-linky-party-was-success-and.html
Sandi @ The Primitive Skate
Looks like alot of hard work went into making this, but it turned out Beautiful. You do amazing work, Gail.
Cherica
You are such a creative genius!
Mel
Oh my goodness, you've blown my socks off! Love every little thing about this. Well done.
Mimi@blueroofcabin
That is inspired! I love what you did to that old desk. I am very impressed!
marissa
wow that is beyond impressive I'd love you to add it to what we wore and made party over at http://raegunwear.blogspot.com
Jennifer @ Just A Girl
NO WAY! I am in awe! this looks awesome!!
Leslie
wow - I am amazed!! I would never have come up with something like that in a million years!!
Margaret
Oh, I've seen a lot of fantastic projects on various blogs this year, but this, girl, takes the cake! What vision, and I know firsthand how difficult MDF furniture can be when trying to take a "sow's ear and turn it into a silk purse."
Stephanie
Bunco! I didn't know you played bunco! Taking those winnings and spending them on the hardware was well worth it. It just finishes off that beautiful tower of terror. This is a perfect item for a craft room! Won't take up much space, but you can fill it with a ton of stuff. Great, great job Gail, I think you should put it in your office by your work table/coffee table 🙂
Jamie @ Sew Rockin'
I love morphing one thing into something totally different! Awesome job 🙂
Lori C
LOVE it!! Do you have a Hobby Lobby nearby?? They have fantastic knobs at great prices!! (always 50% off)I would keep all sorts of stuff in this, clothes, accessories, etc. Seems like there's never enough drawers when you need them! I may just need to make my own tower...
Full Circle Creations
Oh my gosh! I'm so impressed! I love how it turned out! Great job! I even love the knobs!
Holly
Finders Keepers
Gail, I think you're brilliant! What an idea turning a desk into a tall chest of drawers! I've got several old 70's desk in my junk-furniture-storage-lean-to...they may be destined for this treatment.
Have you ever considered using Bondo (the two-part automotive body putty) instead of spackle or wood filler? It’s pretty easy to use, sticks well, is inexpensive (relatively) easy to shape (with a sure-form rasp and sandpaper), and definitely durable. I use Bondo as my main filler on all of my furniture projects.
Thanks for the great idea!
Scott
Toqua's Crafts
Oh I KNEW it!! When you gave us the preview on FB I knew what you had done! I love it!! I think the stencil you used is perfect... and the hardware... PERFECT!!! Wonderful Wonderful work!!
Debilou ~ Mississippi Mama
Not sure what I'd use it for but I love it! Never would have thought of stacking them like that. And you cant even tell what it used to be.
Oklahomaredhead
I really do like this piece you made. The black with the stencil and glass knobs! Classic and clean! You have given me more ideas for stuff than anyone else. This piece would look wonderful in a bedroom to be used as an acessory cabinet. Belts purses jewelry, etc.
Kelli
OH.MY.GOODNESS. That is incredible. Seriously, Gail, you should be some sort of highly paid professional furniture repurposer! If I could, I'd create that job for you, so the entire world could see your awesomeness! If the size was right, I'd totally use that to store my scrapbook paper! It would be an amazing organizer. And very pretty, I might add 🙂
Peggy
Oh Gail this is incredible! It is EXACTLY what we have been looking for in the boys' room. We have tried shelves in the closet to help with their clothes but no such luck! So Now we are looking for a TALL dresser. Thank you so very much for this tutorial! Now I know how to go about "making" my own!!
I love the black and grey with the glass knobs. Very classic looking!
Jessie K
Gorgeous! I love the black and white!
Layn @ reignalayn.blogspot.com
WOW!
Korrie@RedHenHome
This is a spectacular re-design! You amaze me. I love the knobs, the stencil, and the cute feet. In my house, it would probably get used to hide away fabric and patterns--then I could get rid of the ugly Sterlite drawer-thingy that I hide in my closet 😉
Felicia Kramer
What an incredible redo! Wow!
Suzanne
You are amazing. I love everything about this redo. There are some people who look at something and see potential -- you've definitely got that gift!
Michele {The Scrap Shoppe}
Gail, this is BRILLIANT!! I never ever would have thought to do this. It looks perfect. And I adore the stenciling. Fantastic job!
Katie
This turned out awesome Gail! You are so creative! I love that piece for getting knobs aligned properly!
Proper Prim
Gail, that is truly an amazing piece. I love the different door heights... brilliant idea. I would have never thought to repurpose it like that. You are truly inspiring. Great job... so worth the added effort.
Loving the stencil on front too... just gives it a little more personality. I will never look at one of those desks the same again.
Awesome job... thanks for sharing your wonderful talents.
PS: got to find me one of those drawer hole jigs... great tool to have. I loathe measuring.
Have a great day.
Hugs, Deb
Corn in my Coffee-Pot
Oh wow! this is adorable. I'm looking for something to use in my kitchen for a pantry and better storage for my muffin tins and junk...
so since that's on my mind. I think this would be a perfect pantry for my kitchen!
great job Gail!
Pat
Anne
THAT is brilliant!! Nice job (and boy did you give me some ideas!!!)
Sylvia
Gail, you have done another amazing transformation! I love it!
jamie
it looks awesome!! great job!!!
Cassie @ Primitive & Proper
that is amazing!!! it looks like it was always that way! and love your finishing touches!
artistamyjo
What a beautiful piece,well worth all that work.For me, well I'd put mt art supplies in it !
Hugs
I Play Outside The Box
W.O.W.!!!! You never cease to amaze me!! I wish I could spend a couple days just watching you work on your projects. Your line of tools just amazes me. I would have never known there was such a handy tool for aligning drawer pulls. I just love how this project turned out. Thanks for sharing!!
My Cottage Charm
Your terror of tower turned out amazing...love it! 🙂 I adore those little glass knobs...even if they did almost give you a heart attack paying for them! lol Hardware is crazy expensive!
Thanks for your comment on my mantle...I appreciate it. 🙂 Isn't Carson the sweetest thing! lol
Love you sweet lady, hope you have a very Merry Christmas!
Missy
Gail
A true work of art...a gal after my heart!
Pam
Fantastic once again.....great job.
Terri
OMG...I am seriously at a loss for words! This is A-Ma-Zing! Who knew a desk could become such an awesome piece of furniture...well, you I guess! Only you could pull this off and make it look so professional. Love it!
Also love that you shared another cool tool...that drawer hole measurer thingy (yep, my words) is a must have!
This is why I can't wait to check out your blog everyday. As always, thanks for sharing~
Rose @ Confessions of a Curbshopaholic
Awesome! You really worked some magic on that one. Would never have recognized that as the circa 1992 desk.
Sue
The most beautiful terror I've seen! You did an amazing job with it.
Have a great rest of the week!
Mrs BC
This looks AMAZING! You are such an inspiration.
xx
Who "NEW" Creations
You are the most creative woman I know with a saw and hammer!!! This is truly a piece worth bragging about!.
Michelle
love it, LoVe It. LOVE IT!!!!
Meg and Mum's
Oh your vision is inspiring! You do amazing work and this is no exception. Love it. 🙂