

Warning! Very heavy picture post! You might want to grab a cup of coffee, or your other favorite beverage.

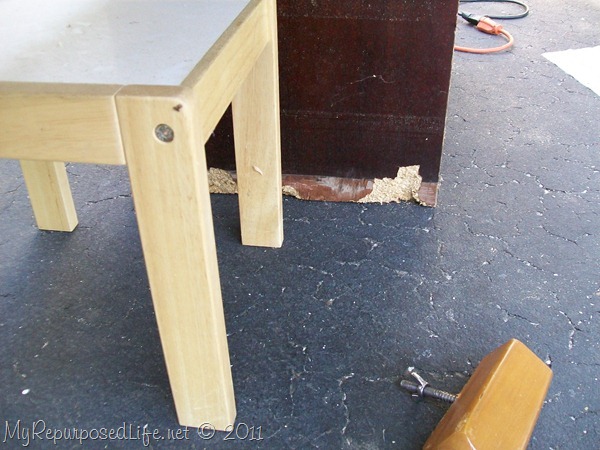
I got this nightstand/side table last year at a yard sale. After a year in my garage it suffered a little water damage. (we had a very wet spring and early summer)

However, I wasn’t going to throw out a perfectly good table--

I pried off the bottom trim, and used my circular saw to trim off the bad wood.

I located a piece of plywood in my stash, it was nearly the PERFECT size.

I removed the top from the table.

I needed two legs. I get out a couple of options.
 I wanted to frame out the top of the plywood so that you wouldn’t see the raw edges.
 I mitered the corners.
 I used my Kreg Jig® K4
 ![]() to make pocket holes in the plywood.
to make pocket holes in the plywood.
 I screwed the facing onto the plywood, then sanded it all down.
 It’s coming together.

 Oh, this is ugly-
 I grab some molding out of the garage and get busy measuring and sawing.
 Kelli-this is for you! How to trim out the bottom of a piece of furniture.
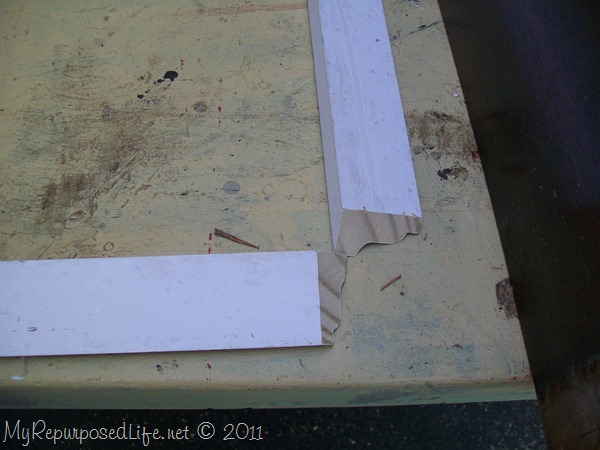
 Do you see that line? It’s not a measuring line, it’s a directional line. When I lay my board on my piece of furniture, I make a line showing the direction that I need to cut the wood.
 To the compound miter saw. I cut it at a 45 degree angle, with the board directly up against the fence.
 For the opposite end, I flip the saw to the other side.
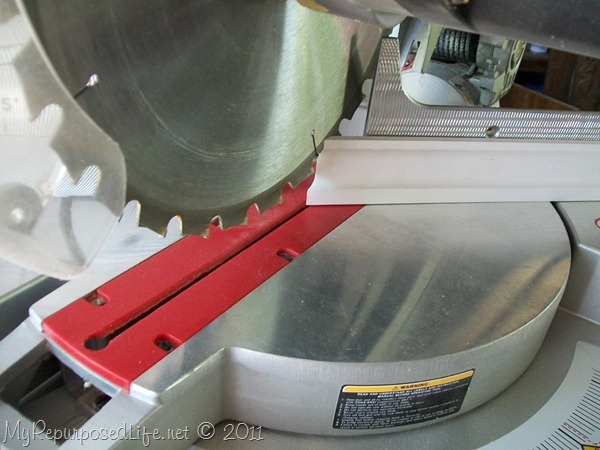 Again, holding it up against the fence of the saw.
 When I do this trim, I do the angles/corners first. The left and right piece I cut a little long, because I can always straight cut it to the right length. I nailed it in place with my nail gun.
 I measured, marked and cut the legs to the right height.
 Now, I’m on to the legs. I used my Kreg Jig to make pocket holes on the legs.
 I dry fit it to make sure the legs are at the proper height.
 In this picture you can see the pocket holes I drilled to attach the facing. I placed the leg on the piece and drew lines so I could figure out which way to drill the pocket holes on the legs.
 I used Gorilla Wood Glue to glue the legs. I typically don’t use glue with the pocket holes, but I wanted to make sure I had a great hold when I secured it with my pocket hole screws.
 After I get both legs on, I start taping it off for painting. I taped all around the top . . .
 . . . then I put newspaper on the top and taped it again.
 Then I broke out the spray paint! Last year my sister gave me tons of spray paint, I’m about ⅓ of the way through the stash.
 I filled the holes with drywall mud. What does this color (blue) make you think of?
 After I finished spray painting the desk, I painted the top with several coats of chalkboard paint.
 I conditioned the top with chalk.
 Once I started spray painting it, I thought to myself, this looks like a Smurf! I was trying to make the desk non gender specific.
 What do you think of the knobs? The original hardware would not be appropriate for children.


This might be my favorite repurpose this year! It was a lot of fun to see it all come together. This chair however is not the chair I’ll be selling with this desk. Jan gave me this chair, I spray painted it black. About a week later she gave me two more chairs. One of those chairs matched this chair, the other is a vintage school chair. I will sell the school chair with this, and then I’ll have a “pair” of chairs for another project. Thanks Jan! I appreciate your thoughtfulness!
What have you repurposed lately?
gail
Related Content: See More Desk Projects Here
Gail Wilson is the author and mastermind behind My Repurposed Life. She is obsessed with finding potential in unexpected places and believes that with a little hard work and imagination, any old thing can be made useful again, including herself!
Gail reinvented herself during a midlife crisis and has found purpose again. She hopes you will find new ideas for old things and pick up a few tools along the way.
Jo Monroe
We make these little desks but in our effort to repurpose using all repurposed items, we use a leaf from a table ( one that no longer has a table of course!!) They are generally already the right depth and often times will have a rim that did match the table but now becomes the perfect leg brace!! Try one !!
Gail Wilson
Jo,
Thanks for stopping by and leaving a comment. Great tip! Although I'm having a little trouble understanding exactly how you bring it all together. I have a couple of table leafs in my stash...
gail
Margaret Mary Myers
Wow! I am so totally amazed by what you do. I "save" clothing for myself and my family, but have never tried furniture. Maybe some day. In the meantime, I just enjoy looking! 🙂
Kelly
So cute, beautiful work!!!!
Latter-daycrafters.com
You are so talented! I love this idea! I am looking for re-purposed items to sell in my online store, http://www.latter-daycrafters.com Take a look and see if there is any of your items you would like to list for sale then let me know what you think! Trina
Joselyn @ The DIY Spot
I think you should be crowned "Queen of the Repurposed World". That is one heck of a transformation. Well done!
The Rosegarden in Malevik
What a Lovley job 🙂
and do not miss.....
S
A
T
U
R
D
A
Y
S
H
O
W
O
F
F
WELCOME 🙂
Håkan ( The Roseman)
The Miller's @ Prezidential Life
Cleaver idea! I do love the blocks as hardware and the poppa snuff shout out!
The millers
Kelly @ Mom's Workbench
This is amazing!! I love how you made the transformation but the cutest detail is the knobs!! This really inspires me to think "out of the box" and imagine what furniture could be instead of just what it is. Thanks so much! 🙂
Sharon
This is adorable. Love the wood blocks for the handles.
Sharon
Good Time Charlie
That is the cutest darn thing! How creative! I can think of lots of shorties I have around that could fill in for this project. How cool!
Full Circle Creations
Very nice! I love the way it turned out. I did sort of the same thing a few years ago for my nephew. Only instead of legs on the end, I made a book case and turned it to the side. Great job Gail!
Holly
Love Of Quilts
Thats just amazing! Trish
- Brittany
Gail, I love your creative, think outside the box, problem-solving thinking! your kid's desk turned out adorable!
Brittany
Becka
Wow. This is truly amazing! This project was obviously A LOT of hard work, and it turned out beautiful in the end! LOVE the chalkboard top!
~Becka
Anita @ GoingALittleCoastal
Wow, that turned out great! It was a terrific way to repurpose that nightstand. I can't wait to get my jig to try it out!
Toqua's Crafts
Another ingenious idea from you! I "Love" the handles! I can also see a kid really enjoying that chalkboard desk top!
Sherrylr
Great idea! I just happen to have 2 sets of night tables in my shop. Guess what will happen to one set. I love the step by step pics.
Sharon @ Elizabeth & Co.
Now that is repurposing at it's best!
Sharon @ Elizabeth & Co.
Now that is repurposing at it's best!
Mimi@blueroofcabin
What a great idea, love how you think! The chalk board paint is the perfect touch. I see you have two Kreg jigs, lucky lady 😉 Oh and the knobs, darling!
My Cottage Charm
Hey sweet girl! 🙂 Glad you liked my mirror molding post, I love how much it changed the room. 🙂 Funny that you knew who was behind the camera before I told....was it the angle of him looking up to me in the video that gave it away?! lol He's such a good little boy! I felt weird going the vlog, but I figured nobody really cares what I look like as long as I'm teaching them something. 🙂 hee hee hee OH and yes I do know about the caulking guns with the pokey things on them...I'm just too cheap to go buy a new one as long as this one is still working. 🙂 lol
Love ya girl!
Missy
Ellie
You are so creative! I would have never thought to make a desk out of a night stand. Love the chalkboard top!
Sara
SO gorgeous!! Would LOVE it if you would link this up at my turquoise lovin' party going on right now!! 😉 http://www.sweetlittlegals.com
Heidi@TheCraftMonkey
Looks fantastic!! You really did a great job repurposing that night stand!
Jennifer
Very creative Gail! You may just have given me an idea. . . Thanks for sharing!
jen
ivenad
This is super cute! I like the knobs! I finished a large vintage library table with chalk board paint on top then mod podged newspaper on the legs. Looks cute I think!
Coley
I love this! What a great and creative way to use old pieces of furniture
Coley @
http://www.whatyoumakeit-coley.blogspot.com
The DIY Show Off
You are so good! Awesome transformation, Gail! Love it! 😉
You'd be proud - I used my air compressor/staple gun finally! haha! Thinking the Kreg Jig is next on my list.
Thanks SO much for the vote! Your help is appreciated!
Roeshel
dana @ wonder forest
this is amazing! So creative, great job!
xo dana
thewonderforest.com
Kelli
Yeah, you're a GENIUS! Seriously. You come up with things that are brilliant! Thank you for the tips on the miter saw...I need to get out there and try it again! I also love the knobs! 🙂
Maggs Creates
That childs desk is fantastic. I really love the furniture tranformations you do. I so want to try some myself.
Cousin B
OK, I'm speechless....I could NEVER seen this vision like you did. It's SO CUTE!
Amy @MaisonDecor
Wow this is a serious project with great results!! You know how to work the tools!
Corn in my Coffee-Pot
I love the tools you work with and am making a wish list for myself!
This little desk...is the bees knees! I love it!
I think it's my favorite too!
some lucky child is going to get this cute desk an make lots of memories there!
Pat
Sandi @ The Primitive Skate
WOW! What a transformation! You've done an awesome job! Looked like it was alot of work, but you pulled it off. You amaze me with all your talent!
Suzanne@Meridian Road
This project is the best! What a great repurpose! You are so SMART, Gail! I don't think I'd have thought of this in a million years.
I really love the knobs~ and the chalkboard top.
Cassie @ Primitive & Proper
you are so stinking clever!
and papa smurf rocks!
Cassie @ Primitive & Proper
you are so stinking clever!
and papa smurf rocks!
Cath
Gail
This is one of the cleverest ideas yet!
I often pass up single nightstands but this would make a super gift for the grandkids.
May I borrow your idea?
Korrie@RedHenHome
This is amazing! I love how your mind works. Super cute project, and love those pulls!
Debilou ~ Mississippi Mama
Hey, Gail,, that is just so cute. Never can tell it used to be a nightstand table. Some little kid is gonna love it.
Paige (Final Clothes-Out)
That's so smart! And I love the blue.
I'm probably not repurposing anything this week, but I am doing a mirror removal in the bathroom. It's glued to the wall. Ugh.
Becky
Great job! I love it! 🙂
jamie
adorable! 🙂
Terri
O-M-G...is there anything you can't build?! This is freakin' adorable! Love how you used those blocks for the knobs...genius~
I wish you lived around here...I just bought a new (to me...it was actually purchased from an estate sale) miter saw, and I have no idea what to do with it...I haven't even had the nerve to turn it on yet (although I know that it does work). Sadly there was no owner's manual and I have not been able to track one down yet. I am very intimidated and sadly my hubby knows less about this stuff than I do! LOL! I just knew that I NEEDED it though!
Jan
You never cease to amaze me! So cute and what a great job. I bet this gets snatched up quickly. I love the "knobs"
Do you have a "photo album" at your booth of all the projects you have made?
Jan
Carole @ The Blue Chateau
I never would've dreamed of turning a nightstand into a desk like this. It's genius!
Cynthia
This is so neat! You did a great job, and I especially like the blocks you used as knobs... so cute!
A Pretty Pastime
Absoultely Fabulous! Love the smurfiness too 🙂 I bet this desk will get sold in a hurry!
kathie
GENIUS, Gail!! I LOVE what you come up with!! The desk is so fun!!!
Sewandthecity
Your recreations leave me speechless every time, great job, love the desk! What amazes me the most is what you are able to see the potential of an old piece of furniture. Here in Frankfurt in Germany people can bring all unnecessary items on Tuesday evening out of their house and just leave them on the pavement for Wednesday rubbish collection. I check out the little piles of furniture every time in the hope of spotting something nice…but my eyes always let me down. Any tips?
I Play Outside The Box
Whodathunk!! What talent you have!
Granny
I like the transformation. Great job of repurposing the nightstand and also making the top a chalkboard. Some child is gonna love that desk.
Rose @ Confessions of a Curbshopaholic
Love the whole thing! This is truly awesome. Thanks for showing how to attach legs w/pocket holes...I've been wondering about that.
Michelle
Your talent amazes me, and you are an inspiration. Good job!