Repurposed door projects are a fun and functional option to make new furniture pieces.
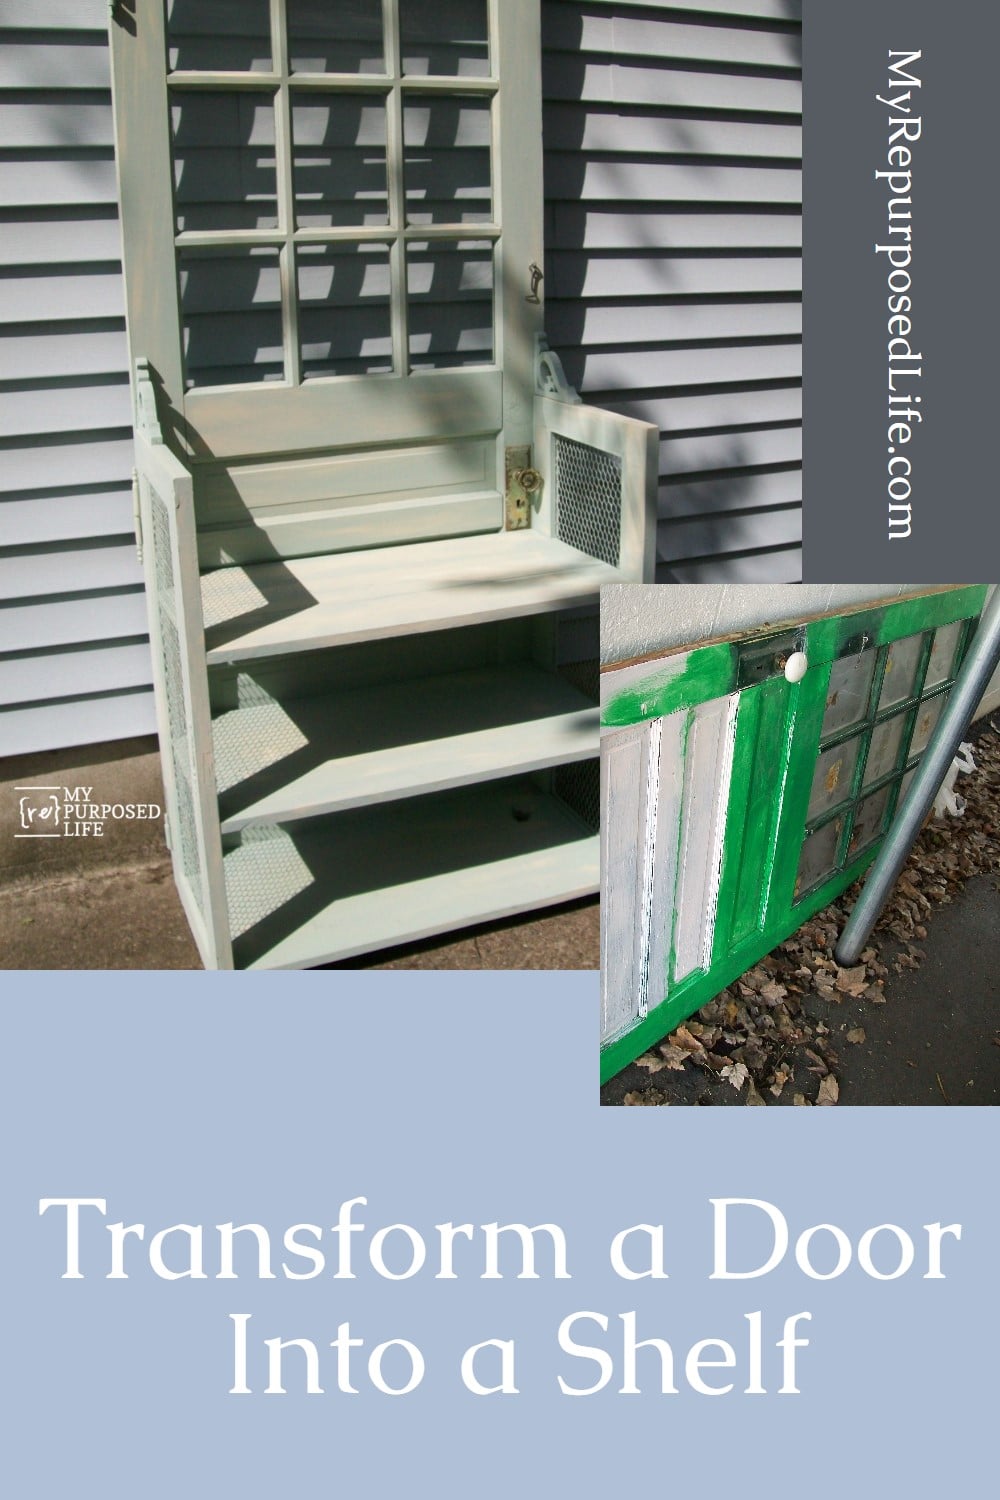
How to Repurpose a Vintage Wooden Door

I have made several things from doors. Did you see my toddler bed and my bookshelf?

The inspiration for this repurposed door project comes from Brittany @ Pretty Handy Girl.
Add Sides to Reclaimed Door Bookshelf

I opted for small screened pieces since I didn't have picket fence pieces.
Clamps Are Helpful When Working Alone

Holding the small cupboard doors with clamps to see if they would work is an excellent way to do a dry fit on a repurposed furniture project when working alone.
Pocket Holes Make Connecting Small Doors Easy

I used my Kreg Jig to make pocket holes for joining the cupboard doors to the old door. Being very portable, this jig is handy for all sorts of projects.
Need more details on using a Kreg Jig? See my article How to use a Kreg Jig Pocket Hole System.
How to Add Shelves to Repurposed Door Project

The 1x6s were connected using pocket holes, as I did for the kitchen island top. They were secured to the side of the small cabinet doors using pocket hole screws.

I notched out the shelves with a jigsaw to compensate for the mesh screen. The pocket holes are located where the shelf connects to the small cupboard door.
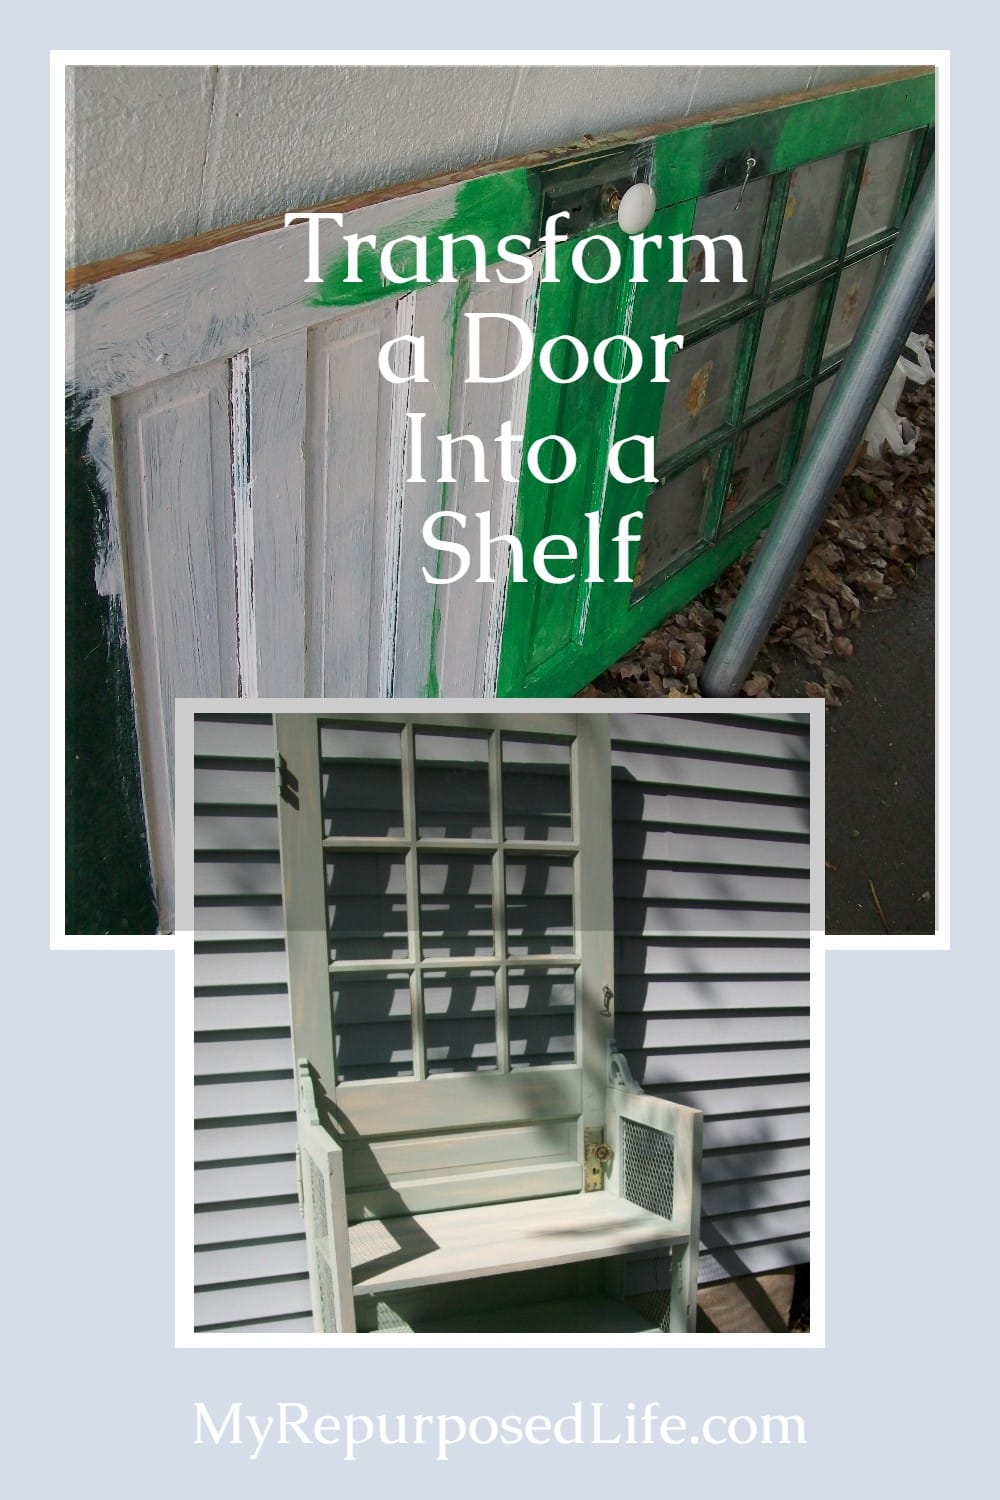
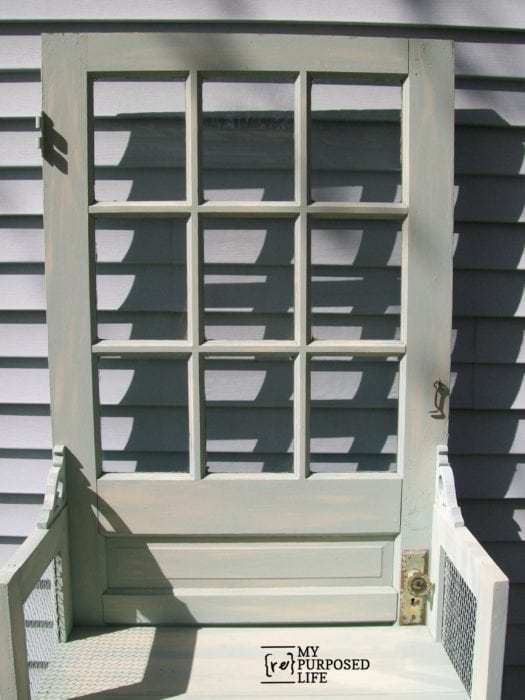
The door had some fabulous chippy paint on it. However, getting the new wood and the white cupboard doors to match the chippy door was a little tricky.
Prepare Repurposed Furniture Project for Painting

Luckily, I had some paint near the same color as the door.

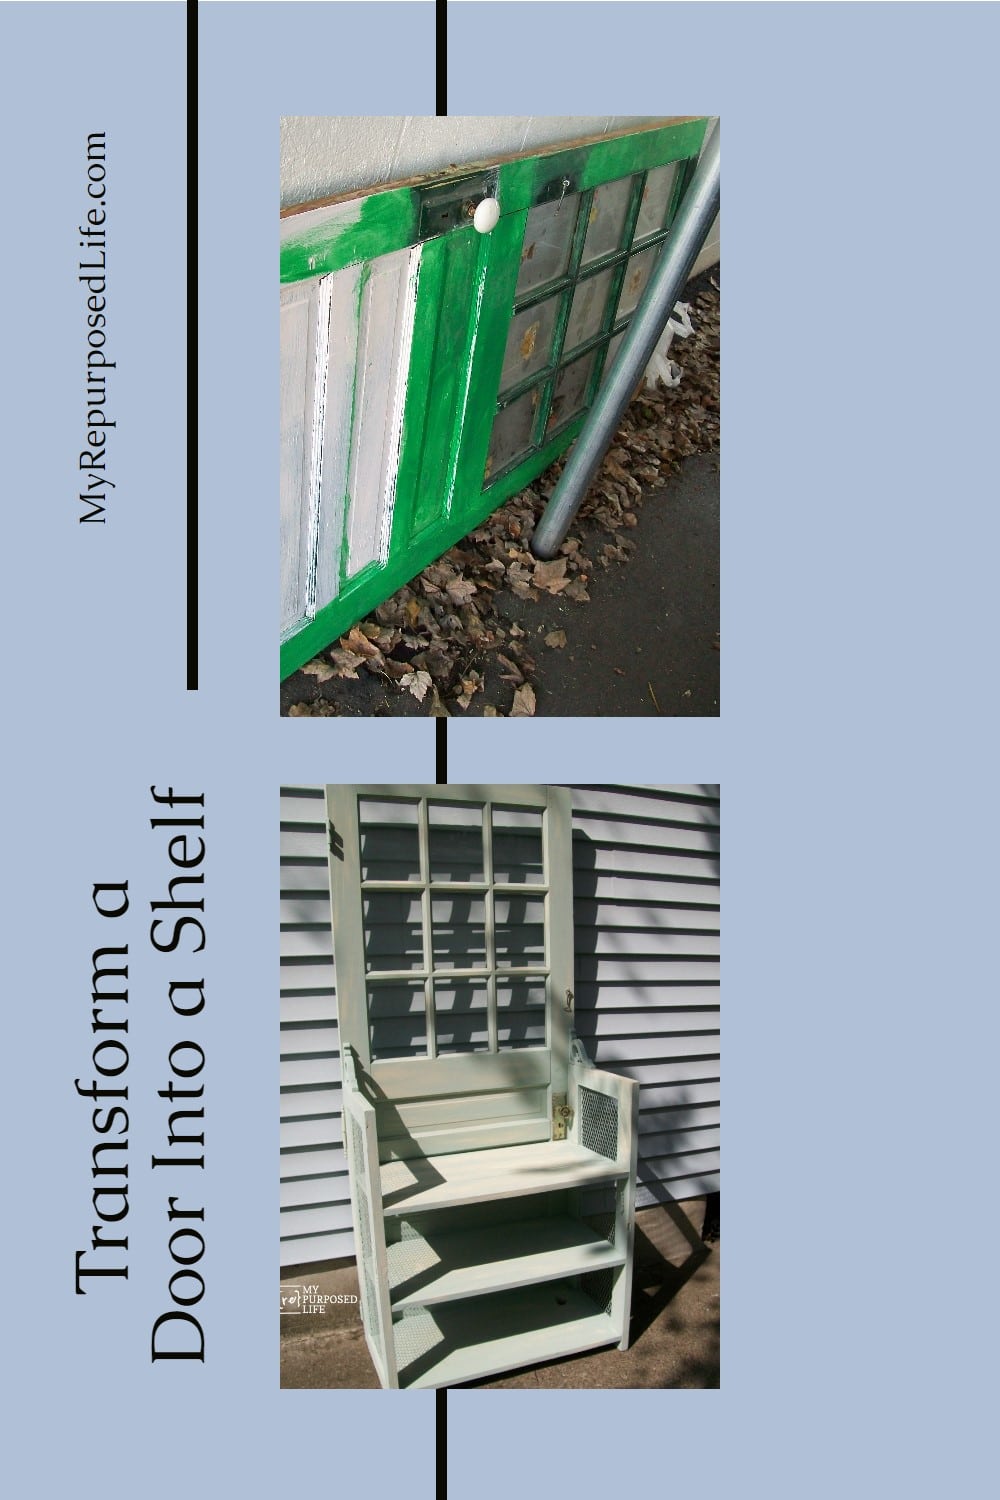
Although taping the window panes is time-consuming, I won't have to scrape off the paint on the numerous window panes.

This is the back side of the door. That's a pretty wild paint job, huh? I'm sure you know by now the easiest way to paint a project like this is by using a paint sprayer. My favorite is the Super Finish Max Extra.

I love the new color. In fact, I love everything about the repurposed door bookshelf.

You can see that the paint sprayer is the only way to paint a project like this. Using a paintbrush would leave you with lots of runs and drips.

You can see that the paint sprayer is the only way to paint a project like this. Using a paintbrush would leave you with lots of runs and drips.
Dry-brush Furniture Projects

I used a light cream-colored paint to do a dry brush effect. This was done to give the project some definition.

In addition, the holes from the pocket screws were filled with spackling.

A light sanding helped everything blend well together.

I wasn't sure if I should put the glass knob on.

I felt like it needed a little something where the small doors meet the large door. What do you think?
Add Finishing Touches to Repurposed Door Nightstand
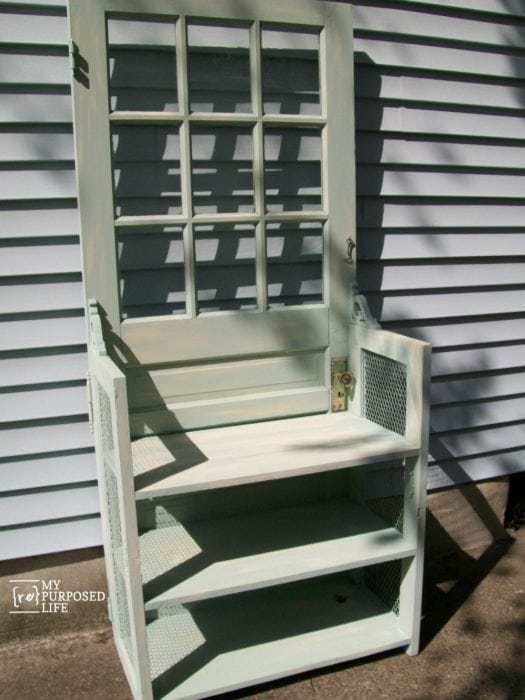
I added the finishing touches . . . door latch, door knob, and brackets in the corner.
gail
Check out other door projects here or this fun Cupboard Door Bookshelf
See More Hall Tree Project Ideas Here
Gail Wilson is the author and mastermind behind My Repurposed Life. She is obsessed with finding potential in unexpected places and believes that with a little hard work and imagination, any old thing can be made useful again, including herself!
Gail reinvented herself during a midlife crisis and has found purpose again. She hopes you will find new ideas for old things and pick up a few tools along the way.
Kippi
Beautiful results. I love everything about the door up-cycle project. The color is my favorite!
Brittany Bailey
Looks super cute! Thanks for the link to my nightstand 😉
Matty
Hello,
the link for the harbor freight sprayer you use is now just a redirect to the main site. Which did/do you use for painting the furniture pieces?
lauren @ West Furniture Revival
wow this turned out great!!! Great idea how to repurpose the door.
love it
Felicia
That is so beautiful! I think it would be a great outdoor piece too! Maybe for a garden? Love!
Would love for you to share at Calling All Crafters, today!
http://allthingsfee.blogspot.com/2011/04/calling-all-crafters-4th-edition.html
Good Time Charlie
This looks fantastic! I love door transformations, and this is one the coolest I have seen. I am new to the linky party, but I do one every Friday as well. I showcase the winners on Monday. I would love it if you would stop by and link up! Have a lovely weekend. -Karen
http://www.redoux.blogspot.com
Amanda
Hmmmm, two comments on your blog in like 5 minutes! I feel like I'm stalking you! This looks wonderful, it's amazing what you can do with other peoples 'tat' very inventive!
Amanda
Hey Gail! Featuring this on Craft Gossip this afternoon 🙂
Kristi @ Addicted 2 Decorating
Visiting from FJI! This is simply brilliant. I never in my life would have though to use a door like that. And I love the color(s) that you used on it as well. And dang it...I HAVE to get me one of those jigs!! I keep seeing people use it on their projects, and it makes everything so nice and neat.
I started a weekly link party (on Sundays) over at Addicted 2 Decorating. I hope you'll come link up!
Sommer
Wow oh Wow this is FABULOUS! You always do such amazing repurpose jobs. I love the chicken wire and the color. I hope you will share this at my VIP party today =) http://designergarden.blogspot.com/2011/04/vip-party-11.html
Michelle@Somedaycrafts
YOu are too creative. Love this! I wish you were in my neighborhood!
Barbara Jean
turned out great!!!!
blessings
barbara jean
Toqua's Crafts
I really like the corner brackets!! I think that finishes it off so well!
Kudos for a great job!
Blessings
Amy {The Idea Room}
I absolutely love this! You are so creative. Love the paint color too!
Heather
That turned out awesome, love it!
http://craftiestthings.blogspot.com
Who "NEW" Creations
Beautiful work, AGAIN!
Michelle @Shellsshabbyshack
This looks awesome, Gail! I don't think it needs anything. The green paint really works! I could see hanging a wreath from the top to hang in front of the windows. What a fun piece!
🙂 Michelle
BB Goad
great idea! thanks for sharing. i just love old doors 🙂
Brenda
Could even modify slightly and use as a hall tree in the entry way. Love it.
Shelly
So cool! (I know, someone already said that!) I like the idea to add hooks. It is hard to tell if the top will need "balancing" because it is still taped up. I think it is just gorgeous!
Anita @ GoingALittleCoastal
Oh I forgot to mention, you could add some hooks to the front edges of the big door. I have that on my shutter halltree. Quite handy.
Anita @ GoingALittleCoastal
Gail, you did such a great job on this. I love this piece. It has so much character. I don't think the cupboard doors need anything. I like it as is. I'd ad the knob back even with books. It could be the bookend.
Windmill Memories
Love the door project. I love anything made with old doors or windows. I have two benches in my house made from old doors, one still has the door knob and the other one doesn't. So they look good either way. Thanks for sharing, so glad I found your blog.
Jan
It's so neat to hear about my door/nightstand! LOL!
The cat's name is MewMew! Kinda a dumb name, but it's what he comes to.
I love to read all of these comments.
Hasn't Gail done a great job. You should see what else she has done with my junk!
Jan
The Rusty Bucket
I can see the need to add something to make it crazy-unique but it really isn't necessary. It's functional with a simple design. I love the chicken wire on the cupboard doors! MAybe that's statement enough. Very cool project!
-Bethanie
Rose @ Confessions of a Curbshopaholic
That is such a great door and I love it with the shutters on the sides and shelves.
You did a great job on this one! I do agree with Suzanne that simple corbels would be a nice transition from the door to shutters if you wanted to add a little something. But it definitely isn't necessary! Looks great as is!
Sue
As always: Love it! Right now I'm only doing tiny project, can't wait for it to be warmer (and dry) to get going with the big stuff outside.
Hugs,
Sue
SuttonsDays
I simply cannot go a day without reading your blog. You are an inspiration!
We just picked up a great old door at St. Vincent this past weekend. My husband had no idea what I was thinking when I said I had to have it. Now I'm even more excited to create something with it.
I'm debating on a shelf like this or a table like Rose potting table.
Thank you so much for blogging!
Cassie @ Primitive & Proper
that looks awesome!!! it would be so cool to replace the windows with with mirrors, too!
Cassie @ Primitive & Proper
that looks awesome!!! it would be so cool to replace the windows with with mirrors, too!
Rebekah★All Thingz Related★
It's looking terrific! I'm really liking it!
I have so much I'm wanting to get done but it has been so windy and today it is POURING DOWN! Ugh.
Debilou ~ Mississippi Mama
looks good Gail..love the color.
Midwest Cottage and Finds!
It is so ironic that you mentioned getting my moneys worth on the U Haul..after I saw my couch-I knew I would have to get a U Haul-so in my mind I am calulating the cost, plus extra gas for hauling a trailer, plus the stress of driving home ALONE for 16 hours and not being able to back it up!! The cost of the couch was such a good deal i could not pass it up--plus I found my PERFECT wash stand that I could put in the U Haul also.so after some mental gymnastics I decided to go for it..and so glad I did...wait till you see how the wash stand is turning out...I am loving it!
hugs,
chris
Mimi@blueroofcabin
Very Cool! This turned out great! I need one of those Kreg Jig Jr thingys. You should do a give away for that that only I can enter. 😉 You are so talented!
Jester
I love your blog, you are always making the coolest stuff! What a creative mind ou have!
Terri
Oh my...this is one of the cutest things I have ever seen (along with your door nighstand and bed). If Jan doesn't love it, I'll take it, lol! You are such an inspiration...I love the things you create!
Shirlee
What a great piece. I can see it being used in many areas of one's home. You do great work!
Suzanne@Meridian Road
That is such a great project! I love how it's turned out, and that green! Gorgeous!
I think it looks fantastic how it is, but if you wanted something for the top of the cupboard doors, how about some small corbels in the corners where the cupboard doors meet the back?
Becky@Beyond The Picket Fence
Wow, love it! You did a great job Gail. And such patience to tape all those windows off :).
PicturePerfectPixies
I think, if you are going to add another shelf, it should be see through. Just in case she puts a cool knob on there. Some type of window pane?
It looks fantastic. How creative you are...
Meg and Mum's
Fantastic! You're so bloody talented 🙂
Lesley Litrento
Okay. You asked for ideas for the top and I one came to mind. I was looking at a mirror project yesterday. I think you should use the same technique on the window panes. Might look kinda cool.
I found it on the DIY sight, but here is the link:
http://thediyclub.com/2011/04/damask-stenciling-on-a-mirror-by-gail/?utm_source=feedburner&utm_medium=feed&utm_campaign=Feed%3A+DiyClubInc+%28DIY+Club+inc%29
If the link doesn't work, go the the DIY Club blog and look at the "damask stenciling on a mirror by gail posting. Anyway, the project looks great! Just thought I would share!
Lesley
Cindy @ LeChaiseParfait
I love this Gail it looks great good job. I think she is going to love it.
Granny
I love it, especially with the chicken wire on the cupboard doors. As Coleen said, it doesn't need anything else.
Coleen's Corner
Great job! Love the color - would be perfect in my dining room : ) I don't think you need anything on top of the cupboard doors. Once it gets put to use, I'll bet it will look just fine!
Diane in the Valley
Great job!
Home Made Quilts By Granny
I need one of these in my new bathroom. Trish