How to make a toddler bed out of a repurposed door
I showed you the toddler bed made from a door last week, but I didn’t explain any of the particulars. Today I will fill you in.
 This is the door I started with. I had already applied primer and paint to one side. The other side only had primer.
How to cut straight with a saw
That is why you’ll see a pink door below:
 I needed to cut the door into two sections. Generally I would do this type of task on my table saw. I was unable to do that with this door due to it’s size and weight. First, I measured how large I wanted the headboard and foot board to be.
 In order to get a straight line, I clamped a board to the door to serve as a “guide” for my saw.
 The only circular saw I have is battery operated and it wouldn’t make it across the width of this door. I used my jigsaw. Without this board as a guide, I would have never been able to cut a straight line.
 This picture is to show you that you must make allowances for the width of the shoe plate. (in your measurements)
Use crib spindles for feet of repurposed door toddler bed
 I didn’t want the door to set directly on the floor, so I had to figure out what I could use for feet. Fortunately I had some spare crib spindles. I used the parts in between the holes.
 After I got them cut, I needed to drill a hole so that I could screw them onto the bottom of the door. I use a washer to help find the center of a circle.
Coat long screws with bar soap
 You can see in this picture how I clamped the foot to drill the hole. I also used Gorilla Wood Glue on the feet.
TIP: Coating your screw with soap will help the screw go into the hard wood faster and smoother. Click to Tweet tip.
Use original side rails for new toddler bed
 I used regular side rails I had in my stash. I cut them down to fit a crib mattress.
Add cleats to hold mattress
 To help give the side rails extra strength, I made a cleat for both the headboard and the foot board. I glued them with Gorilla Wood Glue and then I screwed them into place.
 Here you can see the cleat and the cute little feet.
Paint toddler bed parts
 I painted the side rails and the top rail of the headboard and the foot board.

 This is the bed without the top rail attached to the headboard and the foot board.
Attach top rail to headboard and foot board
 Of course I used my favorite gorilla wood glue again.
 Here you can see the foot board’s top rail attached.
Add wide slats for crib mattress
 I cut some extra wide planks to help support the crib mattress since I wasn’t using the springs that a crib would have.
Use deck brackets to attach side rails
 To attach the side rails to the headboard and foot board I used some brackets I got from the deck dept at Home Depot. I put all the screws in the side rail but only used two screws for the headboard/foot board. That way when someone buys this bed and takes it to their house, they can add the additional screws for strength, and they will be secure.
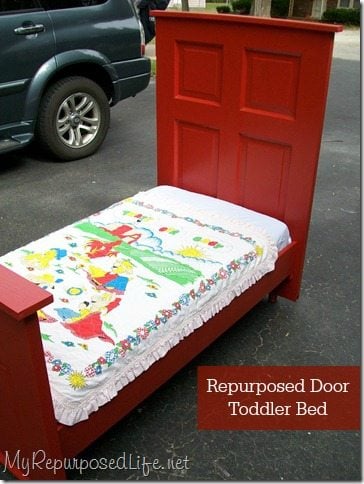
 Voila! Here is the finished bed!
 If you have any questions, just leave a comment below.
Check out other door projects here
Gail Wilson is the author and mastermind behind My Repurposed Life. She is obsessed with finding potential in unexpected places and believes that with a little hard work and imagination, any old thing can be made useful again, including herself!
Gail reinvented herself during a midlife crisis and has found purpose again. She hopes you will find new ideas for old things and pick up a few tools along the way.
Jill
What did you use for the top rails. I plan to make this very soon.
gail@myrepurposedlife.net
Jill
top rails? On the foot board? I used a 1x something. I may have ripped down a 1x6 or used a 1x4 I'm not sure, it was a long time ago. 🙂
good luck, have fun with your project!
gail
Anonymous
My kids would brake that in two seconds.
Andrea
Clever, beautiful, creative, useful,genius, budget friendly, what else can I say??
Love it!
Ngozi
Pure genius! Two thumbs up! And any other cliches you can think of that mean "this is awesome".
Handbags*N*Pigtails
Gail, you are amazing! This is the cutest toddler bed Ive ever seen. So proud of you!
xo,
Sarah
Brooke
Very cute bed! I love that you painted it a fun, bright color
Deanna
I love, love this! It really turned out amazing. I was looking through doors at our habitat for humanity store to maybe to a headboard for my bed. This really gave me some ideas, thanks!
dining room table
You really did a great job on the bed! Perfect. Very creative and so resourceful.
Anita @ GoingALittleCoastal
And congrats for making the Top 10! I'm thrilled to be up there with you. 🙂 You inspire so many.
Anita @ GoingALittleCoastal
This comment has been removed by the author.
Anita @ GoingALittleCoastal
Your talents always amaze me Gail! The toddler bed is just so sweet. Makes me want a grandchild! I better not say that out loud though, not quite ready!
The DIY Show Off
It's awesome! You have the best DIY skills - so creative and such amazing quality! Great job! 😉
Roeshel
Holly
You constantly impress me...what a fabulous idea for a toddler bed. I want one for my kiddo!
ALVN of WhisperWood Cottage and Junkologie
Clever and colorful! I love to see repurposed items!! Thanks for linking up to the DIY Project Party monthly contest! 🙂
Amy
Abigail Prescott
What a charming idea! I love it -- thanks for the inspiration.
TruWhim
Oh my gosh. I find my jaw on the ground often when I check out your posts. It is beautiful.
Pam
Lady...you are just the neatest person! I have no clue where those ideas come from but keep them coming....By the way, I have a new grandson, 3rd one....two weeks now. Big brother Caleb and middle brother DJ are doing great with Braden.
Kim -today's creative blog
Hey cutie, you are my featured blogger today! Email me krjdemmon@comcast.net
Cassie @ Primitive & Proper
i think you are genius.
Cassie @ Primitive & Proper
i think you are genius.
Infarrantly Creative
Oh my gosh how sweet. I see vintage books and stuffed animals next to it. How perfect. Again your brilliant. When are you going to invite me down for the day to do a cool project or vlog? It could be fun.
Kimberly
oh my gosh, that's the cutest thing EVER. Wow. Maybe I'll move my son BACK to a toddler bed. Now, to find an old door...
Debilou~Mississippi Mama
Oh,, and thats a great tip for cutting a straight line.. All i use is my jig saw (i'm scared of skill saw) so I cant wait to try that out.
Debilou~Mississippi Mama
well you just make it look so dang easy.. You are one talented lady.
Cousin B
You are amazing! I kept reading thinking, "How is she gonna make THIS look like a toddler bed?" I had to show my DH! Thank you for sharing your ideas and talents with us! Maybe someday, I'll get enough ambition to tackle one myself! Ha!
Kate@TwentySixToLife
What a great idea!
Suzanne
Dang -- that is sooo cute! I'm bookmarking this one!
corinne
this is so divine..I love finding thrown away treasures and creating something out of them..I have been a vintage clothier for years and love to reuse and recycle!
this is a beautiful bed!
Corinne
Tammy@ Not Just Paper and Glue
That is really a cute idea. It is amazing how with just a little imagination, just about anything can be used to create something new - and useful!
Candace@craftysisters-nc
Thanks for explaining the details! I have not tried using a clamped piece of wood yet with my jigsaw for a guide. That will be so helpful when you need a straight cut. And, I have never tried soaping my screws..how cool! The bed is awesome by the way!
Shea
lovely! amazing! Keep up the awesome work.
Granny J
That is really cute and what little one wouldn't love a bright red bed? Great reuse of that door.
Corinna
This is spectacular! I didn't think you could top that gorgeous bookcase from the other day, but you have outdone yourself with this! 🙂
Corinna
katskraps4kids
WOW! That is just SOOOOOOOOO cool, how you did that! I am without toddlers at this point but I see the vision. I have a file of "stuff to do for my grands" & this is going in it!!!